
Beauty lighting has always intimidated me a little. I’ll be honest. I came up through travel and lifestyle photography, where “good light” usually meant golden hour and a willingness to wake up at 5am. Controlled studio work felt like a different language, and I kept putting off learning it properly. What finally cracked it open for me was a practice I’d never thought to try: picking apart a famous portrait and working backward from what I could see.
In this Sean Tucker tutorial, he does exactly that with a 1990 portrait of Michelle Pfeiffer shot by legendary celebrity photographer Terry O’Neill. Tucker calls the skill “learning to see the lighting,” and it’s the same idea behind photographer Ted Sabarisi’s old blog “Guess the Lighting,” where he created lighting diagrams for iconic magazine covers. The goal isn’t just to copy one image. It’s to train your eye so that every portrait you encounter becomes a free lesson. Watch the full tutorial on YouTube
What I love about Tucker’s approach here is that he chose an image that isn’t his personal style, which takes guts. He describes the Pfeiffer portrait as “traditional beauty lighting,” and he’s right that it looks deceptively simple. The more you stare at it, the more craft you start to notice. Here’s how to work through the same process yourself.
Step 1: Start With the Catch Lights
 Close-up of Michelle Pfeiffer portrait showing eye catch lights
Before you touch a single light, study the subject’s eyes in your reference image. The catch lights, those small reflections of the light sources visible in the iris, tell you almost everything you need to know. In the Pfeiffer portrait, Tucker spots a distinctive donut-shaped catch light near the top of each eye. That circular shape with a dark center is the signature of a beauty dish. If you see a large soft rectangle, that’s a softbox. A small sharp dot usually means a bare strobe or a reflector at a distance.
Close-up of Michelle Pfeiffer portrait showing eye catch lights
Before you touch a single light, study the subject’s eyes in your reference image. The catch lights, those small reflections of the light sources visible in the iris, tell you almost everything you need to know. In the Pfeiffer portrait, Tucker spots a distinctive donut-shaped catch light near the top of each eye. That circular shape with a dark center is the signature of a beauty dish. If you see a large soft rectangle, that’s a softbox. A small sharp dot usually means a bare strobe or a reflector at a distance.
Notice also where in the eye the catch light sits. A reflection sitting high means the light source is placed high. Low in the eye means the light is lower than you’d expect. This detail tells you the angle and approximate height of the key light relative to the subject’s face.
Step 2: Identify the Key Light Source
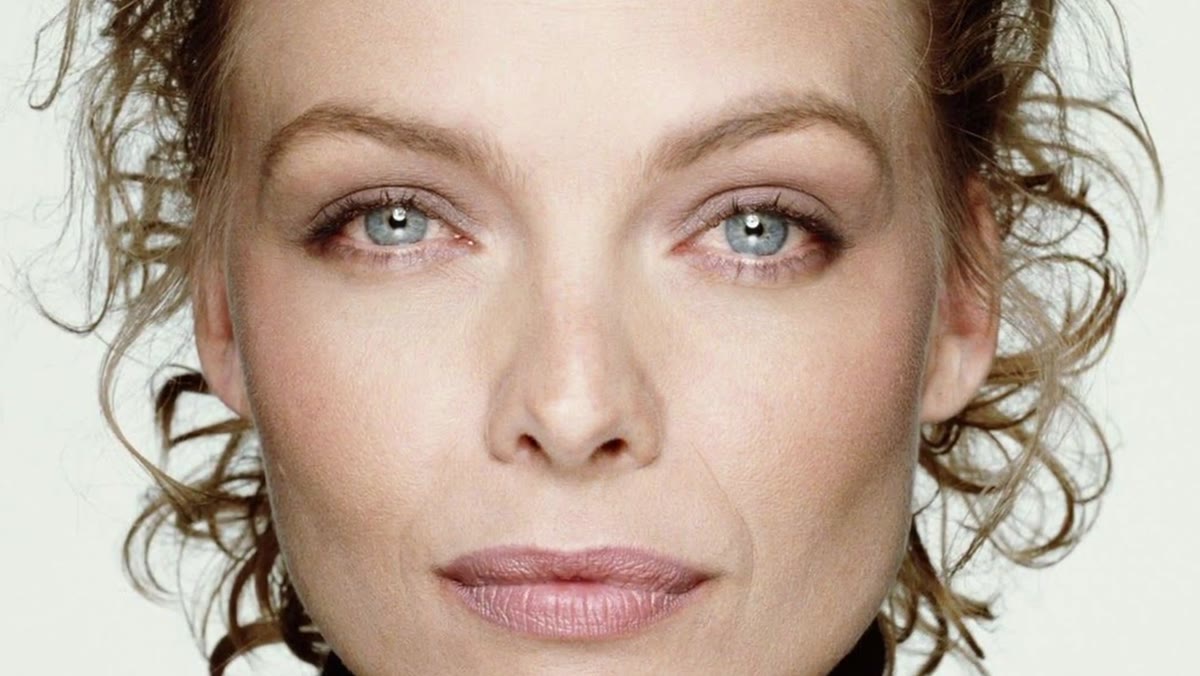 Diagram or description of beauty dish position above camera
Tucker reads the Pfeiffer catch lights and concludes the key light is a silver beauty dish. Here’s how he gets more specific: the catch light appears relatively low in the eye, which suggests the dish was positioned closer to the camera’s lens height rather than raised high overhead. The light is also quite specular, meaning it has some contrast and punch to it, which points to a silver interior rather than a white one. White beauty dishes produce a softer, more diffused result. Silver ones retain more edge and brilliance.
Diagram or description of beauty dish position above camera
Tucker reads the Pfeiffer catch lights and concludes the key light is a silver beauty dish. Here’s how he gets more specific: the catch light appears relatively low in the eye, which suggests the dish was positioned closer to the camera’s lens height rather than raised high overhead. The light is also quite specular, meaning it has some contrast and punch to it, which points to a silver interior rather than a white one. White beauty dishes produce a softer, more diffused result. Silver ones retain more edge and brilliance.
For your own setup, start with the beauty dish centered directly in front of the subject, just above the camera lens. A silver beauty dish without a diffusion sock gives you that slightly harder, fashion-forward quality. If you only have a softbox, you can approximate the effect by keeping it small and pulling it back slightly to reduce its apparent size.
Step 3: Spot the Fill Light
 Description of second catch light visible at bottom of eye
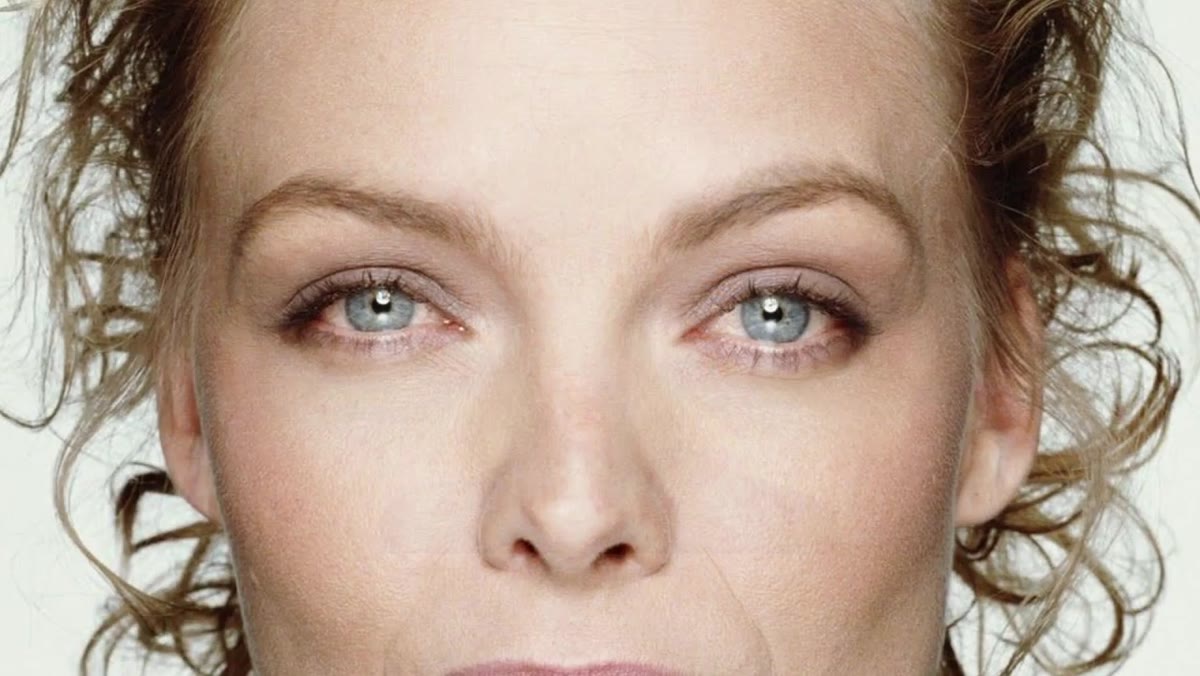
Look back at the eyes again. Tucker notices a second, softer catch light sitting at the bottom of the iris, directly opposite the beauty dish reflection above. That second reflection is your fill light. Its shape is round and softer than the key, which leads Tucker to conclude it’s a large silver reflector positioned below the subject’s chin, bouncing the key light back up into the shadows.
Description of second catch light visible at bottom of eye
Look back at the eyes again. Tucker notices a second, softer catch light sitting at the bottom of the iris, directly opposite the beauty dish reflection above. That second reflection is your fill light. Its shape is round and softer than the key, which leads Tucker to conclude it’s a large silver reflector positioned below the subject’s chin, bouncing the key light back up into the shadows.
The silver surface is important here. A white reflector would produce a wider, flatter fill. Because silver is more specular, it actually throws back a concentrated reflection of the beauty dish itself, which is why the fill catch light is round rather than a vague glow across the bottom of the eye. You can use a proper 5-in-1 reflector on its silver side, or even a piece of foam board wrapped in emergency mylar blanket if you’re improvising.
Step 4: Understand the Clamshell Configuration
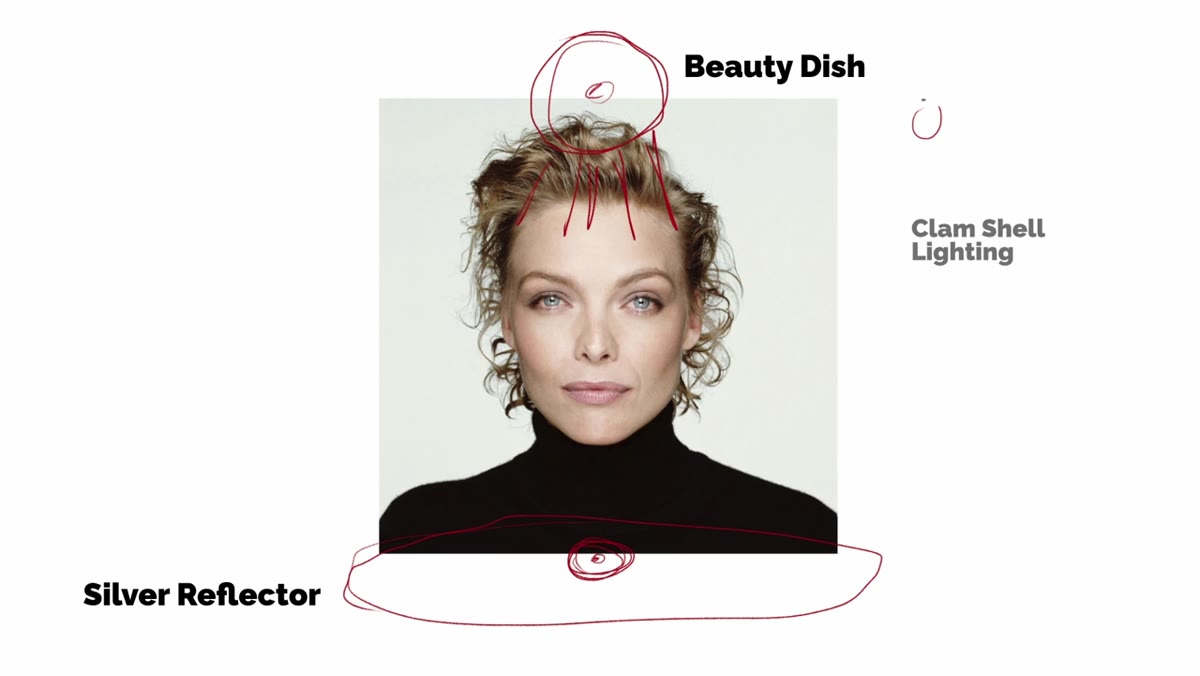 Illustration of clamshell lighting setup with dish above and reflector below
Put steps two and three together and you have clamshell lighting. The name comes from the shape: imagine the subject’s head as the hinge point, with the beauty dish forming the top shell opening downward, and the reflector forming the bottom shell opening upward. Light wraps the face from both directions simultaneously, which is why this technique flatters skin so effectively. Shadows under the nose and chin are filled before they can go dark.
Illustration of clamshell lighting setup with dish above and reflector below
Put steps two and three together and you have clamshell lighting. The name comes from the shape: imagine the subject’s head as the hinge point, with the beauty dish forming the top shell opening downward, and the reflector forming the bottom shell opening upward. Light wraps the face from both directions simultaneously, which is why this technique flatters skin so effectively. Shadows under the nose and chin are filled before they can go dark.
The key to making it work is balancing the two sources. The beauty dish is your dominant key. The reflector underneath is always secondary. Too much fill and you lose the dimensional quality that makes a face look three-dimensional. Too little and you get unflattering chin shadows that the technique is specifically designed to eliminate. Tucker suggests the original portrait kept the fill subtle enough that you almost have to look for it.
Step 5: Keep the Background Simple and Neutral
 Pfeiffer portrait showing clean, neutral background
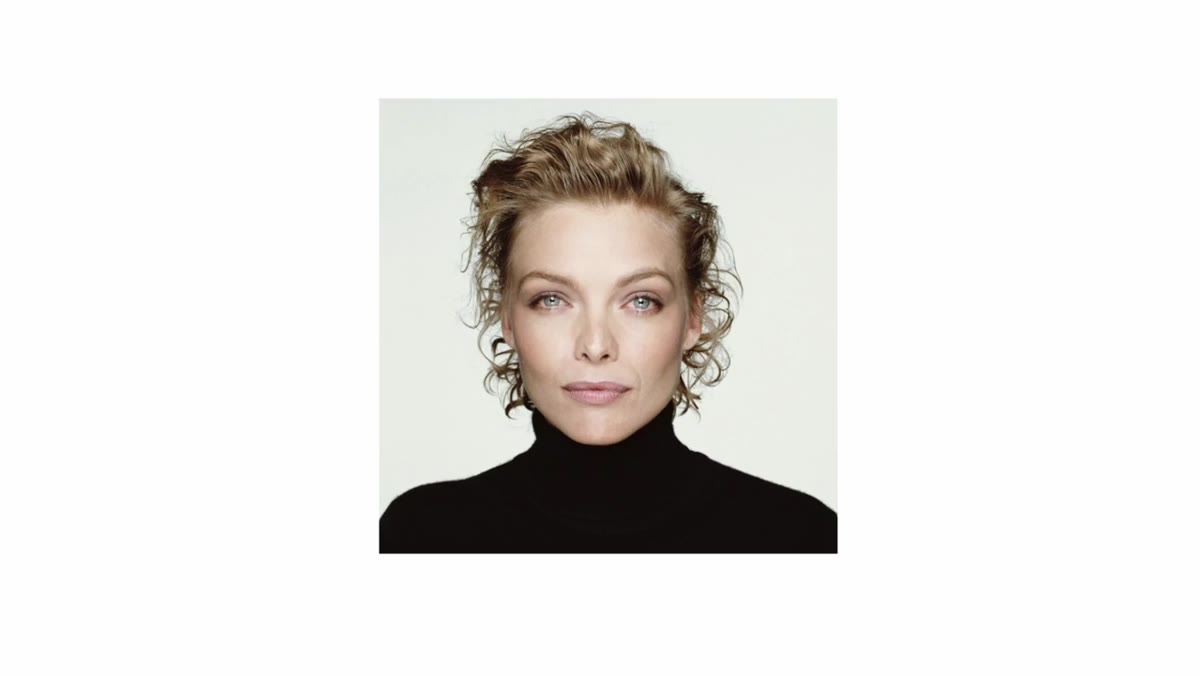
The Pfeiffer portrait uses a clean, neutral background that puts all attention on the subject’s face. This isn’t an accident. Clamshell lighting is a close, controlled setup and a busy or colored background would fight the precision of the light. For your own recreation, use a seamless paper backdrop in light gray or white, placed far enough behind the subject that the wrap of the clamshell doesn’t spill onto it too brightly.
Pfeiffer portrait showing clean, neutral background
The Pfeiffer portrait uses a clean, neutral background that puts all attention on the subject’s face. This isn’t an accident. Clamshell lighting is a close, controlled setup and a busy or colored background would fight the precision of the light. For your own recreation, use a seamless paper backdrop in light gray or white, placed far enough behind the subject that the wrap of the clamshell doesn’t spill onto it too brightly.
Exposure matters here too. If your background goes pure white, you lose the sense of depth. Aim for a stop or two darker than the subject’s face so the background sits back visually without going so dark that it looks moody.
My Own Caveat: Practice the Analysis Before You Practice the Setup
I spent an embarrassing amount of time my first year trying to recreate lighting setups by guessing. What Tucker’s tutorial quietly teaches, underneath all the specific technique, is that the analysis comes first. I now keep a small private folder on my phone of portraits I’m studying. During my Sunday photo walks I’ll stop at a coffee shop, pull up a reference image, and just spend five minutes reading the light before I take a single frame.
The discipline of asking “where is the catch light, and what shape is it?” before touching any gear has done more for my portrait work than buying any new piece of equipment. You can do this with your phone camera and a reflector from a craft store, and the fundamentals will be identical to what Tucker is teaching with a full studio setup.
The single most important takeaway from this tutorial is deceptively simple: your subject’s eyes contain a map of the entire lighting setup. Learn to read that map and you can learn from every portrait ever made, not just the ones shot in setups you already understand.
Watch the full tutorial on YouTube to see Tucker work through the full recreation with his model, including how the final results compare to the original O’Neill portrait.
Comments (2)
Shared this with my photography group. Everyone loved it.
Bookmarked. Coming back to this one for sure.
Leave a Comment