
For a long time, I had a complicated relationship with photo editing. I’d come home from a Sunday morning photo walk with images I was genuinely excited about, sit down at my desk, open Lightroom, and immediately feel the enthusiasm drain out of me. I knew the tools were there. I just didn’t know what I was actually trying to do with them beyond making things brighter and hoping for the best. The photos came out technically fine and completely forgettable.
That changed when I started paying closer attention to how experienced photographers approach the editing process as a continuation of the creative work, not a correction phase bolted on at the end. In this Mark Denney tutorial, he walks through a technique centered on one deceptively simple idea: a photograph is a two-dimensional surface trying to represent a three-dimensional world, and your job as the editor is to use light to create that missing dimension. Once I heard him frame it that way, a lot of things clicked.
The tutorial uses a landscape shot from a Colorado workshop, underexposed in the foreground with a blown-out sky, which is exactly the kind of real-world problem image most of us are actually working with. Here’s how to follow along with the technique he demonstrates, step by step.
Step 1: Get a Workable Baseline with Auto Adjustments
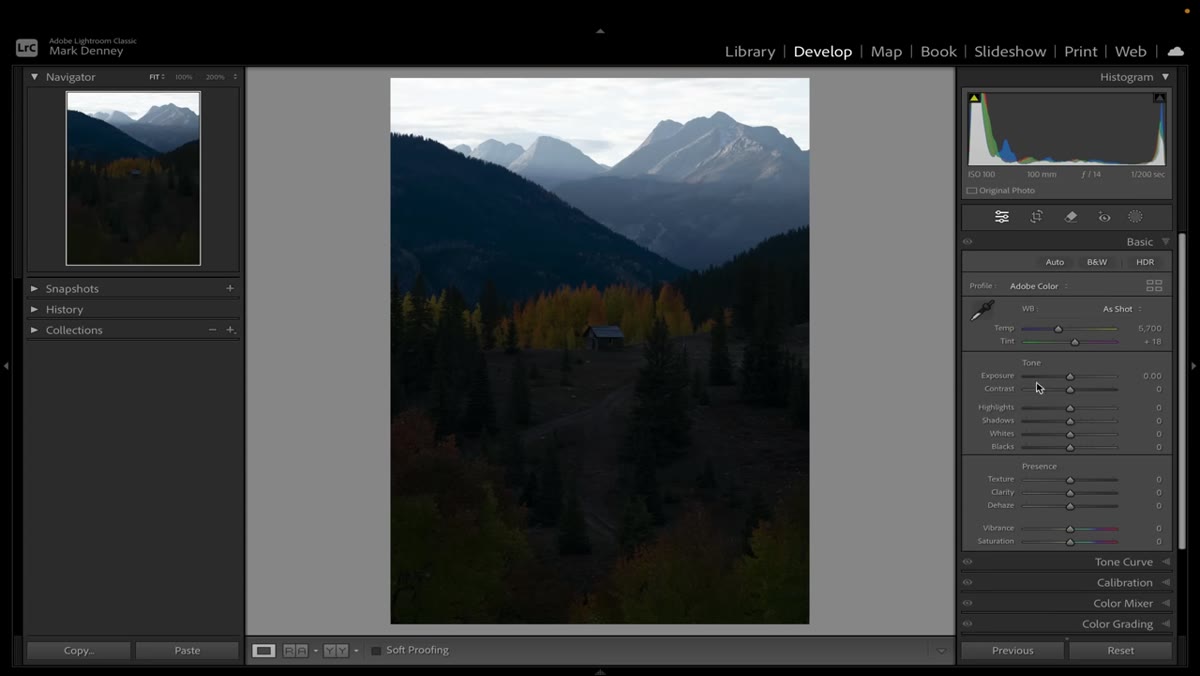 Lightroom Basic panel before any adjustments applied
Before anything creative happens, you need to be able to see the image clearly. Mark starts by holding Shift and double-clicking individual sliders in the Basic panel to let Lightroom’s auto-analysis set an initial value for each one. This isn’t about trusting the algorithm to finish your edit. It’s about getting the image out of the mud so you have a real palette to work with. Think of it as turning on the lights in a dark room before you start rearranging the furniture.
Lightroom Basic panel before any adjustments applied
Before anything creative happens, you need to be able to see the image clearly. Mark starts by holding Shift and double-clicking individual sliders in the Basic panel to let Lightroom’s auto-analysis set an initial value for each one. This isn’t about trusting the algorithm to finish your edit. It’s about getting the image out of the mud so you have a real palette to work with. Think of it as turning on the lights in a dark room before you start rearranging the furniture.
After the auto pass, spend a moment looking at what Lightroom suggested and decide what doesn’t feel right. An auto adjustment is a starting point, not a commitment.
Step 2: Refine the Basic Panel Manually
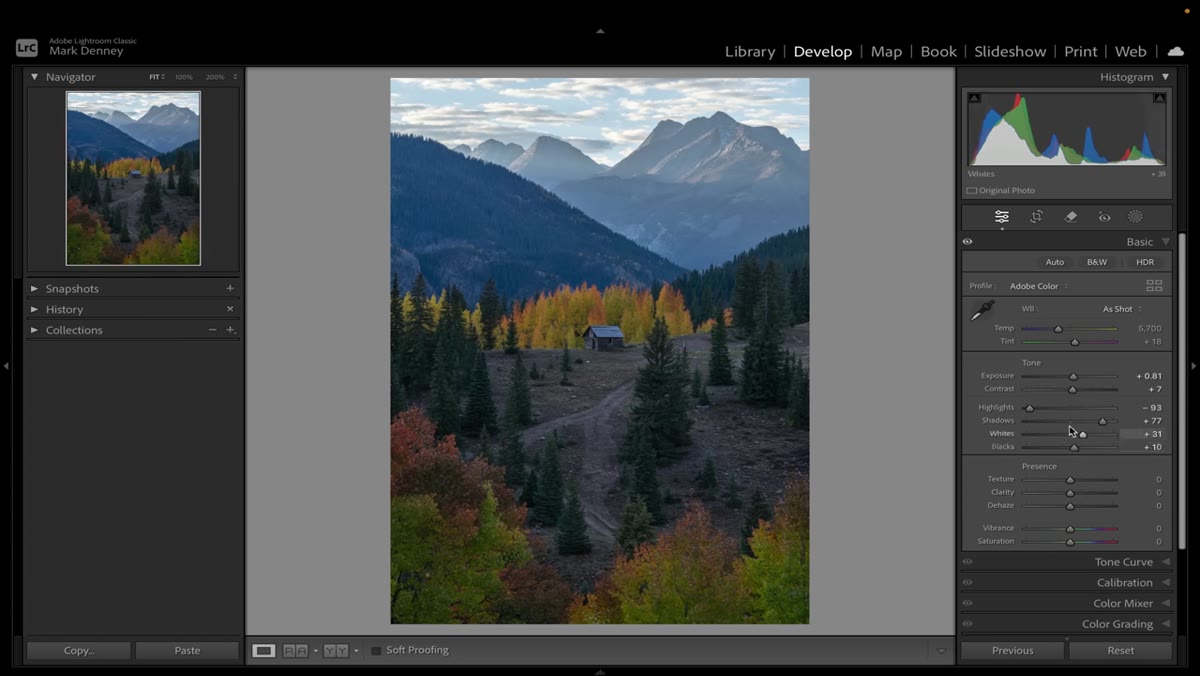 Basic panel sliders being adjusted individually after auto pass
Once you have a rough baseline, go back through the key sliders with intention. Mark pulls the Highlights down less aggressively than the auto pass suggested, brings the Black Point up slightly to open the shadows without losing contrast, and dials back the Exposure because he knows he’ll be adding light in a more targeted way later. He also drops Clarity a touch (a habit of his for keeping things from looking over-processed) and bumps Texture slightly to bring back some surface detail.
Basic panel sliders being adjusted individually after auto pass
Once you have a rough baseline, go back through the key sliders with intention. Mark pulls the Highlights down less aggressively than the auto pass suggested, brings the Black Point up slightly to open the shadows without losing contrast, and dials back the Exposure because he knows he’ll be adding light in a more targeted way later. He also drops Clarity a touch (a habit of his for keeping things from looking over-processed) and bumps Texture slightly to bring back some surface detail.
White balance matters more than most beginners give it credit for. For this warm sunrise image, Mark pushes the Temperature up toward 8000K to honor the natural color of the light. Your setting will depend on your scene, but the principle holds: white balance should reflect the mood of the light, not just aim for neutral.
Step 3: Understand Why Flat Light Kills a Photo
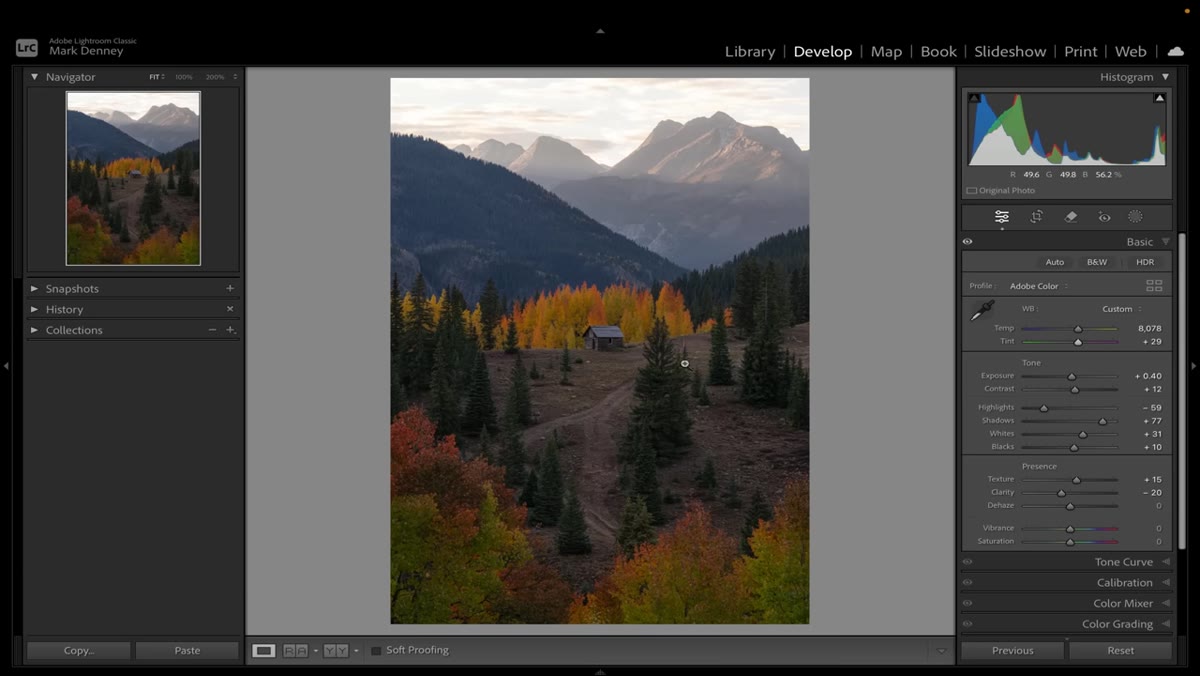 Flat-looking image displayed after basic corrections
After the basic corrections, the image is visible but still feels lifeless. This is where Mark pauses to explain the core idea, and it’s worth sitting with it for a moment. Because photography collapses three dimensions into two, the brain uses cues like light and shadow to reconstruct a sense of depth and space. When the lighting across an image is uniform, whether uniformly dark or uniformly bright, the brain has nothing to work with. Everything reads as equally important, which means nothing reads as important at all.
Flat-looking image displayed after basic corrections
After the basic corrections, the image is visible but still feels lifeless. This is where Mark pauses to explain the core idea, and it’s worth sitting with it for a moment. Because photography collapses three dimensions into two, the brain uses cues like light and shadow to reconstruct a sense of depth and space. When the lighting across an image is uniform, whether uniformly dark or uniformly bright, the brain has nothing to work with. Everything reads as equally important, which means nothing reads as important at all.
The human eye is hardwired to move toward the brightest part of a scene first. If you understand that, you can start to use brightness strategically to guide where your viewer looks and to build a sense of dimension that the flat surface of a photo can’t provide on its own.
Step 4: Use Local Adjustments to Add Selective Light
 Masking or gradient tool applied to selected area of image
This is where the technique gets practical. Rather than continuing to adjust the whole image with global sliders, Mark shifts to local adjustments to selectively brighten specific areas. The goal is to mimic how natural light actually falls in a scene: brighter in some places, falling off into shadow in others. In Lightroom, you can do this with the Graduated Filter, the Radial Filter, or brush-based masking depending on the shape of the area you’re working with.
Masking or gradient tool applied to selected area of image
This is where the technique gets practical. Rather than continuing to adjust the whole image with global sliders, Mark shifts to local adjustments to selectively brighten specific areas. The goal is to mimic how natural light actually falls in a scene: brighter in some places, falling off into shadow in others. In Lightroom, you can do this with the Graduated Filter, the Radial Filter, or brush-based masking depending on the shape of the area you’re working with.
For a landscape like this one, a graduated mask over the foreground lets you lift the exposure in the lower portion of the frame without touching the sky. The result isn’t just a brighter foreground. It’s a foreground that feels like it has light falling on it, which is a different thing entirely.
Step 5: Build Depth by Darkening Edges and Lifting the Subject
 Before and after comparison showing depth added by selective exposure
Once you’ve added light to your subject or focal point, the next move is to reinforce it by pulling back the areas you want to recede. Slightly darkening the edges of a frame, a technique sometimes called vignetting but more effective when done with intention rather than a blanket vignette slider, pushes the viewer’s eye inward toward the lighter areas. The contrast between bright and dark regions is what creates the illusion of depth.
Before and after comparison showing depth added by selective exposure
Once you’ve added light to your subject or focal point, the next move is to reinforce it by pulling back the areas you want to recede. Slightly darkening the edges of a frame, a technique sometimes called vignetting but more effective when done with intention rather than a blanket vignette slider, pushes the viewer’s eye inward toward the lighter areas. The contrast between bright and dark regions is what creates the illusion of depth.
Work back and forth between lifting and darkening until the image feels like it has a light source. You’re not inventing something that wasn’t there. You’re clarifying what the camera flattened out.
A Note from My Own Workflow
I’ve found this approach especially useful when I’m editing travel shots taken in flat midday light, the kind of light that makes everything look like a stock photo. What I do now is ask myself before I touch a single slider: where do I want the eye to go first? Answering that question gives every editing decision a reason behind it, and it makes the whole process feel less like guessing and more like finishing a sentence you started in the field.
I’ve also started applying this thinking when I shoot on my phone. Even with a limited dynamic range and no RAW file, simply knowing where you want the brightness to land changes how you expose the original shot. The editing technique and the shooting decision feed each other.
The single most important idea from this tutorial is that editing is not about making a photo look “correct.” It’s about making a two-dimensional surface feel like it has light, space, and depth. Once that clicked for me, I stopped dreading the edit and started looking forward to it.
Watch the full tutorial on YouTube to see Mark demonstrate every step on the actual image. Watching him move the sliders in real time, especially during the local adjustments section, makes the logic behind each decision much clearer.
Comments
Leave a Comment