There’s a photo from last winter that I almost deleted. I’d hiked out before sunrise to catch the light hitting a frost-covered fence line, and the shot was beautiful in my head, but the RAW file came back soft and noisy in a way that Lightroom just couldn’t rescue cleanly. Sharpening in the Detail panel helped, but it introduced those tell-tale wormy artifacts along the edges. I kept the photo, but I wasn’t happy with it.
That experience is exactly why I kept coming back to this topic when I started seeing photographers talk about Topaz Photo AI for sharpening. In this Matt Kloskowski tutorial, he breaks down three specific reasons he reaches for Topaz instead of Adobe when a photo needs serious sharpening work. Matt is careful to frame this as a targeted tool, not a replacement for your whole Adobe workflow, and that framing is what made it click for me.
The honest truth is that Lightroom and Photoshop together are still the best all-around editing package out there for photographers. But “all-around” doesn’t mean best at everything. Sharpening, particularly on problematic files with noise or motion blur, is one area where dedicated AI tools have quietly pulled ahead. Here’s how Matt walks through it.
Step 1: Know Which Photos Actually Need This
 caption: Presenter explains the “problematic photo” workflow category
Before you open Topaz for anything, Matt makes a distinction that I think is genuinely important to internalize: this tool is for your problematic photos. If your image is sharp, clean, and only has moderate noise, Lightroom handles it well enough. Save the Topaz workflow for files where you need the absolute best possible result and nothing in Adobe is getting you there. This keeps your editing efficient and means you’re not over-engineering photos that don’t need it.
caption: Presenter explains the “problematic photo” workflow category
Before you open Topaz for anything, Matt makes a distinction that I think is genuinely important to internalize: this tool is for your problematic photos. If your image is sharp, clean, and only has moderate noise, Lightroom handles it well enough. Save the Topaz workflow for files where you need the absolute best possible result and nothing in Adobe is getting you there. This keeps your editing efficient and means you’re not over-engineering photos that don’t need it.
Think of it as triaging your edits. Most of my travel shots go straight through Lightroom. It’s the ones from a low-light restaurant interior, a bird in flight that was just barely too slow, or a long exposure that picked up motion blur where I now ask myself: is this a Topaz situation?
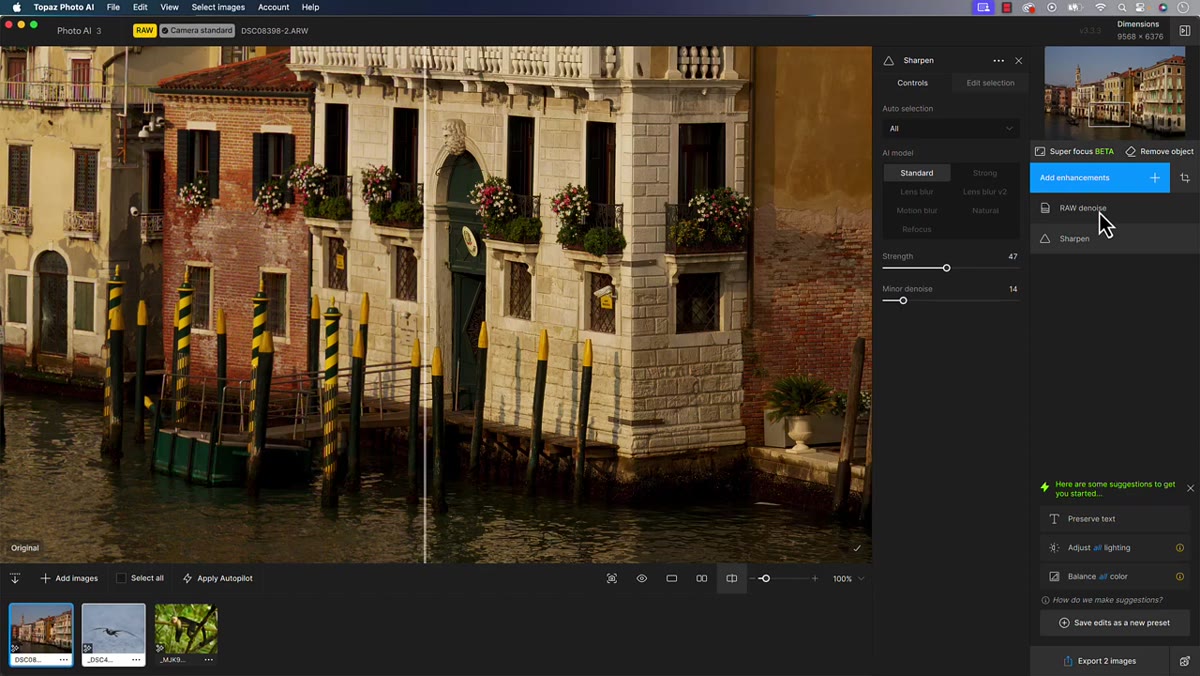
Step 2: Open the RAW File Directly in Topaz Photo AI
 caption: RAW file opened inside Topaz Photo AI interface
When you do bring a photo into Topaz, Matt recommends opening the original RAW file rather than an exported JPEG or TIFF. The reason is straightforward: Topaz can do its own RAW denoising pass before sharpening kicks in, which means it’s working with more original image data from the start. That extra step gives the sharpening algorithm more to work with.
caption: RAW file opened inside Topaz Photo AI interface
When you do bring a photo into Topaz, Matt recommends opening the original RAW file rather than an exported JPEG or TIFF. The reason is straightforward: Topaz can do its own RAW denoising pass before sharpening kicks in, which means it’s working with more original image data from the start. That extra step gives the sharpening algorithm more to work with.
In practice, this means going to Topaz Photo AI directly from your file system (or using the Lightroom plugin export to send the RAW), rather than doing a first-pass edit in Lightroom and exporting a rendered file. You can always do your color grading and exposure work in Lightroom afterward if you prefer. The sharpening and denoising happen best when Topaz sees the file in its rawest state.
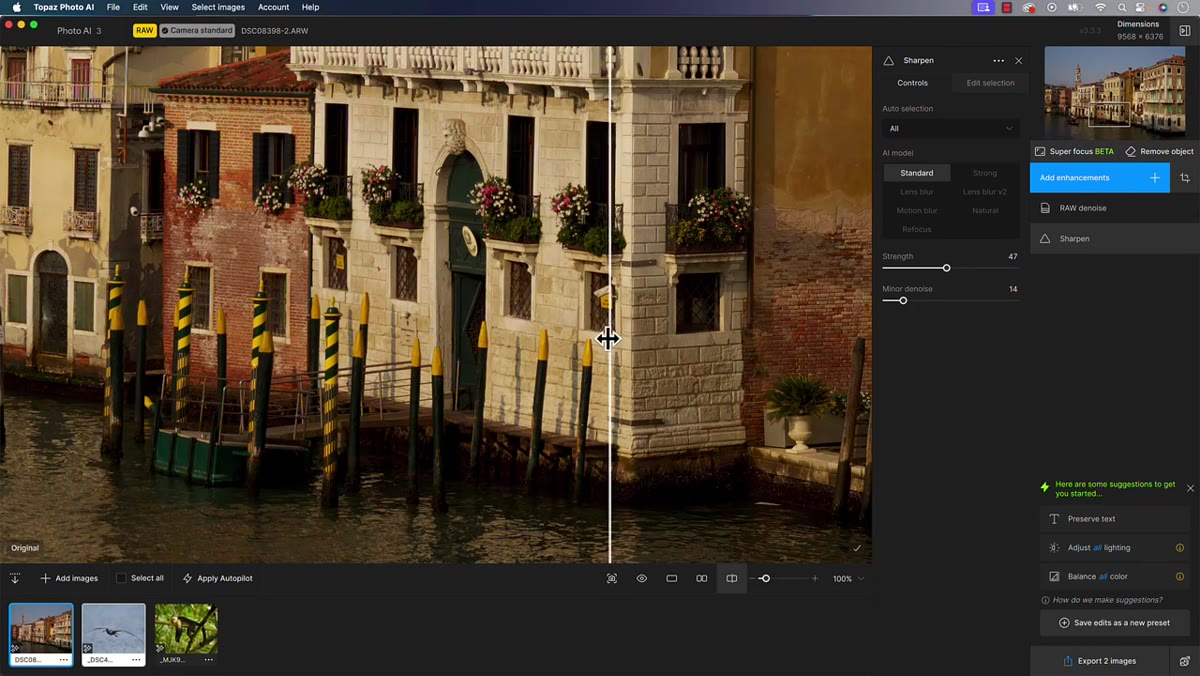
Step 3: Let Topaz Auto-Detect and Apply Sharpening
 caption: Sharpening slider being adjusted on brick wall test image
Once your file is open, Topaz Photo AI will analyze the image and suggest corrections automatically. The sharpening panel gives you several different algorithms to choose from, and Matt demonstrates the difference by toggling the preview on and off against a brick wall section of his test image. That kind of high-detail texture is a good stress test because it shows you immediately whether the tool is creating clean edges or introducing halos and artifacts.
caption: Sharpening slider being adjusted on brick wall test image
Once your file is open, Topaz Photo AI will analyze the image and suggest corrections automatically. The sharpening panel gives you several different algorithms to choose from, and Matt demonstrates the difference by toggling the preview on and off against a brick wall section of his test image. That kind of high-detail texture is a good stress test because it shows you immediately whether the tool is creating clean edges or introducing halos and artifacts.
The brick wall comparison is worth doing on your own test images too. Zoom in to 100% on an area with fine repeating detail, like fabric, hair, foliage, or masonry, and toggle the sharpening on and off. The difference in apparent clarity, without edge fringing, is what you’re evaluating.
Step 4: Compare What Lightroom’s Sharpening Actually Does
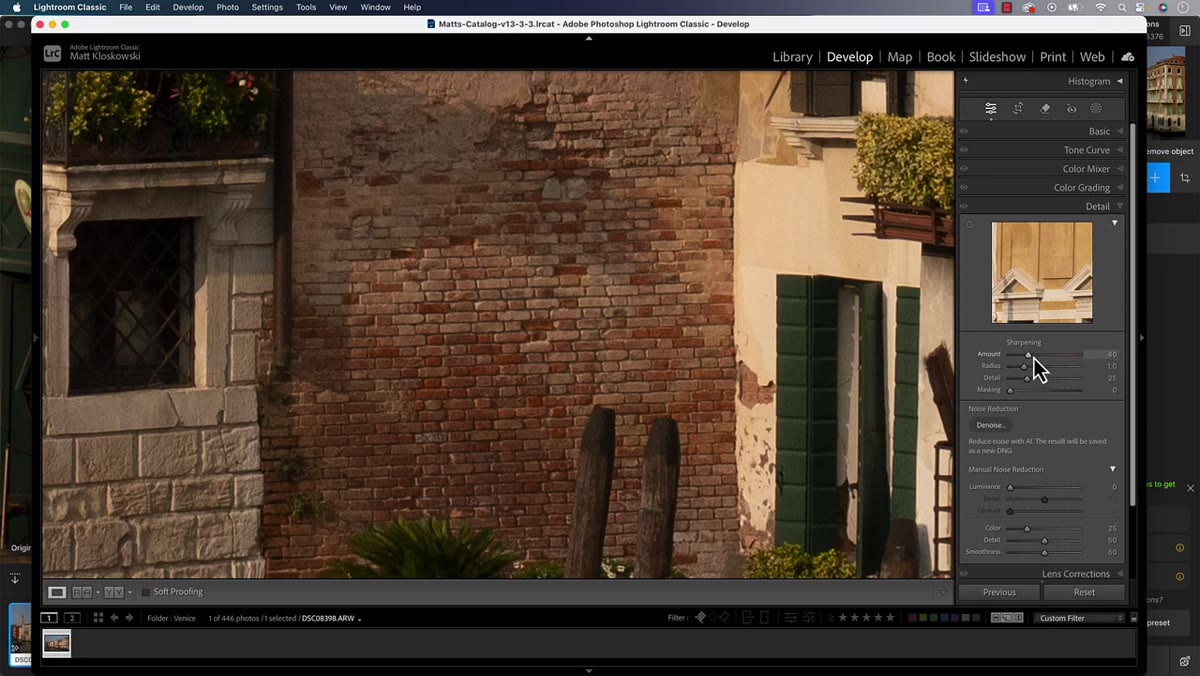 caption: Lightroom Detail panel showing sharpening and masking sliders
Matt spends time in the Lightroom Detail panel explaining what each slider actually does, and it’s worth understanding this before you decide which tool to use. The main Sharpening slider is essentially a contrast-along-edges control. The Radius setting determines how wide an area around each edge the tool looks at, and Detail controls how aggressively that contrast is applied to finer textures.
caption: Lightroom Detail panel showing sharpening and masking sliders
Matt spends time in the Lightroom Detail panel explaining what each slider actually does, and it’s worth understanding this before you decide which tool to use. The main Sharpening slider is essentially a contrast-along-edges control. The Radius setting determines how wide an area around each edge the tool looks at, and Detail controls how aggressively that contrast is applied to finer textures.
The problem is that pushing Detail introduces what Matt calls “wormy” noise artifacts, and then you’re using the Masking slider to try to limit where the sharpening applies, which creates its own set of edge anomalies. It’s a chain of corrections on top of corrections. For a well-exposed, sharp photo, you can manage it. For a challenging file, you’re chasing your tail.
Step 5: Evaluate the Edge Quality Difference Side by Side
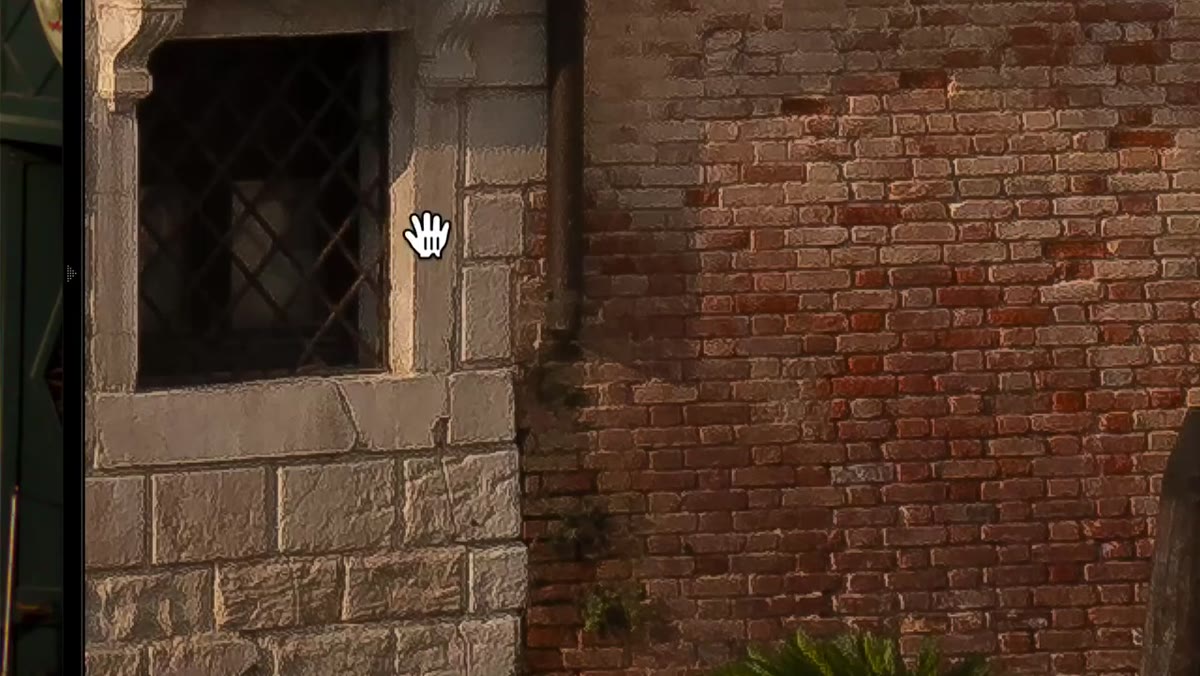 caption: Close-up comparison showing halos on Lightroom-sharpened edges
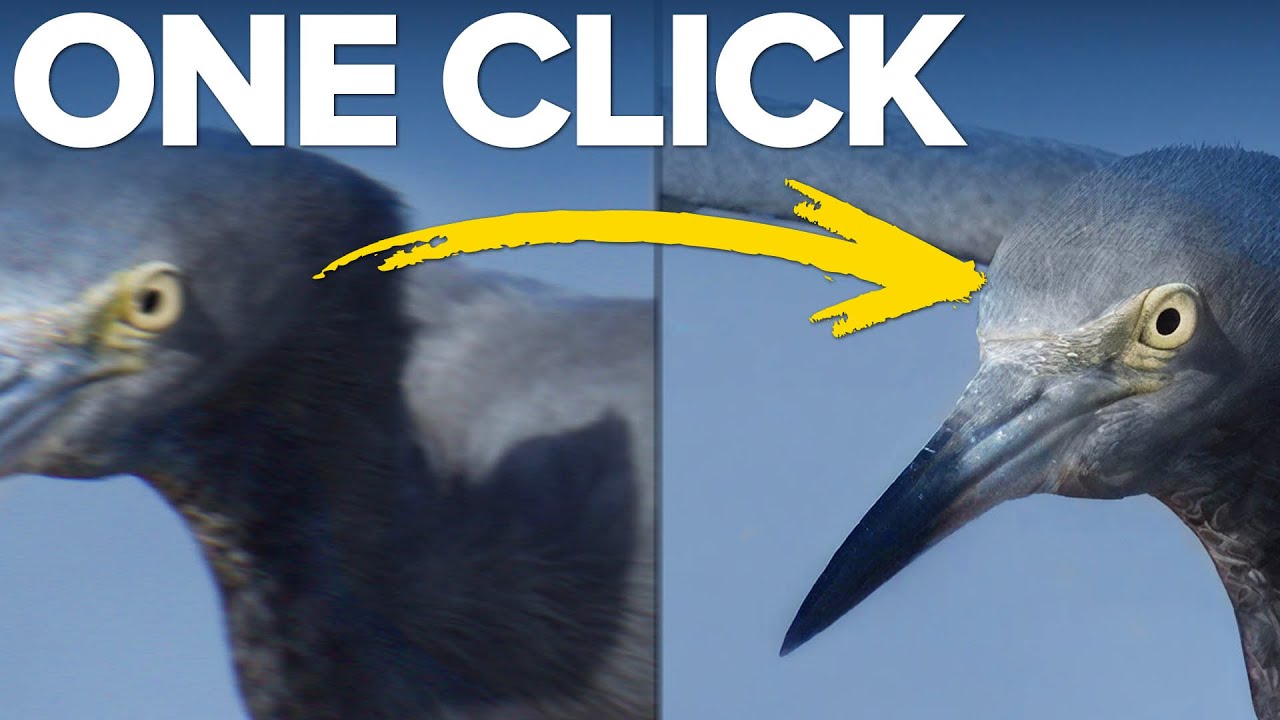
The key visual test Matt uses is looking at contrasty edges in the image, places where a light subject meets a dark background or vice versa. In Lightroom, aggressive sharpening on these areas creates a subtle halo or fringe. It’s not always obvious at web resolution, but print it large or zoom to 200% and it becomes uncomfortable quickly.
caption: Close-up comparison showing halos on Lightroom-sharpened edges
The key visual test Matt uses is looking at contrasty edges in the image, places where a light subject meets a dark background or vice versa. In Lightroom, aggressive sharpening on these areas creates a subtle halo or fringe. It’s not always obvious at web resolution, but print it large or zoom to 200% and it becomes uncomfortable quickly.
Topaz handles those same edges more cleanly because its AI model was trained to understand what a sharp edge actually looks like versus what an artifact looks like. It’s not just adding contrast blindly. It’s making a more informed decision about where detail should be and reconstructing accordingly.
A Note From My Own Editing Table
I want to add one thing Matt doesn’t cover in this particular video, which is the question of where Topaz fits inside a Lightroom-centric workflow without disrupting it. What I’ve settled on is this: I flag my problematic files in Lightroom with a color label during the culling pass. Then I batch-send those flagged images to Topaz, process them, and save the output as TIFFs back into my Lightroom catalog. From there, all my color grading, cropping, and exporting happen in Lightroom as normal. It adds maybe five minutes to the process for those images, and the difference in final print quality has been noticeable enough that it’s now a permanent part of my workflow.
If you shoot mostly in clean, well-lit conditions, you might use Topaz rarely. But if you shoot travel, wildlife, events, or anything in challenging light, you’ll probably find yourself reaching for it more than you expect once you’ve seen what it can do on a file you thought was a throwaway.
The single most important takeaway here is that sharpening in Lightroom is a blunt instrument, and for most photos that’s perfectly fine. But when you have a file that genuinely matters and Adobe’s tools are leaving artifacts you can’t work around, Topaz Photo AI gives you a cleaner result because it’s solving the problem differently. It’s not the tool for every photo. It’s the tool for the ones that count.
Watch the full tutorial on YouTube to see Matt’s before-and-after comparisons and hear him walk through his reasoning directly.
Comments
Leave a Comment