
Every Sunday morning I do a photo walk around Seattle. No agenda, no client brief, just me and whatever I decide to shoot. And for years, my gut approach to composition was basically: rule of thirds, leading lines, done. The shots were fine. Technically correct. But they felt a little lifeless, like I was filling out a checklist rather than making a picture.
What was missing wasn’t more rules. It was an understanding of why any of those rules exist in the first place. That’s exactly the gap that this Sean Tucker tutorial addresses, and it’s why I keep coming back to it. Watch the full tutorial on YouTube before or after reading this breakdown. Either order works.
Tucker’s core argument is worth sitting with before we get into the steps: composition rules are shortcuts that someone else derived from understanding human vision. If you skip straight to the shortcuts, you’ll follow them mechanically and miss the point. If you understand the underlying visual psychology, the rules become tools you can pick up or put down depending on what the image needs.
Step 1: Understand the Four Things Human Eyes Are Drawn To
 Eye-tracking heat map results described over photograph
Before you touch a single composition rule, you need to know what your viewer’s eye will do when it hits your image. Scientists using eye-tracking goggles found four consistent attractors across test subjects looking at photographs. The eye is pulled toward the brightest area in the frame, the most saturated color, the zone of highest contrast, and any human face present.
Eye-tracking heat map results described over photograph
Before you touch a single composition rule, you need to know what your viewer’s eye will do when it hits your image. Scientists using eye-tracking goggles found four consistent attractors across test subjects looking at photographs. The eye is pulled toward the brightest area in the frame, the most saturated color, the zone of highest contrast, and any human face present.
This isn’t aesthetic preference. It’s wiring. Write these four down and keep them somewhere near your camera bag. When you’re standing in front of a scene deciding where to point your lens, these are the forces already at work on your future viewer. Your job is to choreograph them, not fight them.
Step 2: Identify Your Subject Using Those Four Attractors
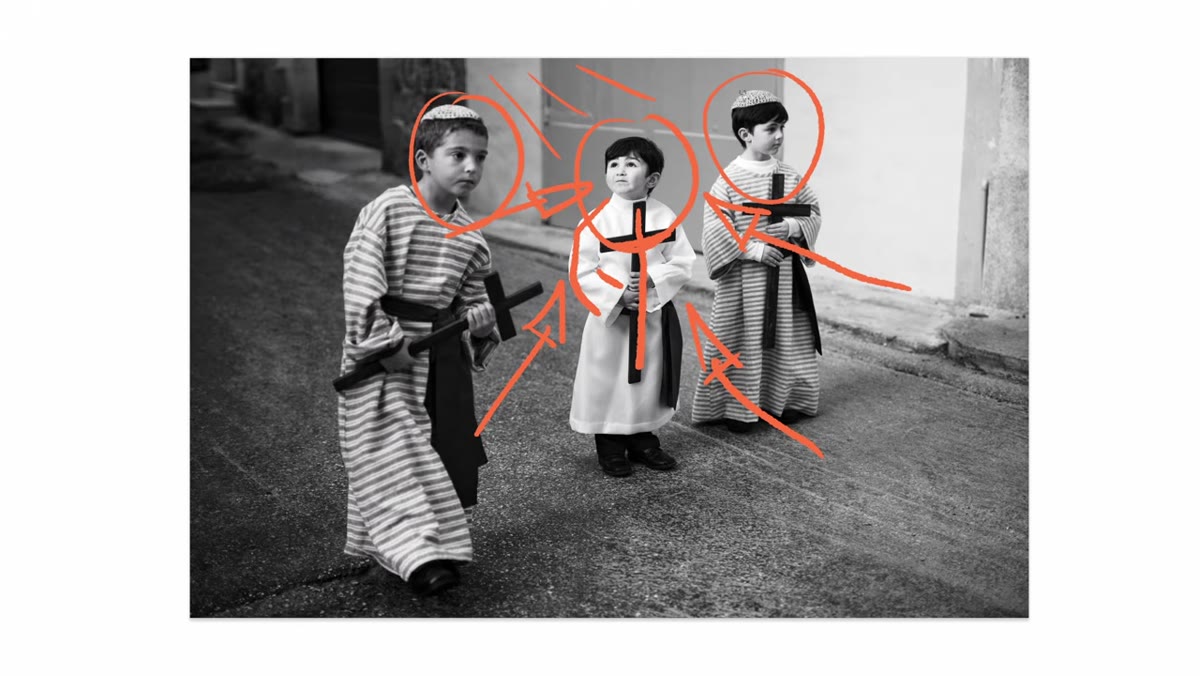
 Easter parade photo with boy in white robe as subject
Tucker works through a photo from a religious parade on the island of Gozo. The subject is a young boy, and Tucker walks through exactly why the eye finds him quickly and stays there. The boy’s robe is the brightest element in the frame. The dark cross against that white fabric creates the highest contrast point. And his face, naturally, triggers the face-detection response we all have.
Easter parade photo with boy in white robe as subject
Tucker works through a photo from a religious parade on the island of Gozo. The subject is a young boy, and Tucker walks through exactly why the eye finds him quickly and stays there. The boy’s robe is the brightest element in the frame. The dark cross against that white fabric creates the highest contrast point. And his face, naturally, triggers the face-detection response we all have.
Before you shoot, ask yourself: which of the four attractors belongs to my subject? If your subject has none of them, you have a problem. If something in the background accidentally holds two of them, you have a bigger problem. This step is really a diagnostic tool you run mentally before you press the shutter.
Step 3: Audit for Competing Attractors
 Discussing background figures and off-white wall as potential distractions
Tucker mentions being worried about a light-colored wall in the frame during that same parade shot. It was off-white and slightly darker than the boy’s robe, so it didn’t steal focus. But if it had been a brighter pure white, it would have split the viewer’s attention and weakened the image.
Discussing background figures and off-white wall as potential distractions
Tucker mentions being worried about a light-colored wall in the frame during that same parade shot. It was off-white and slightly darker than the boy’s robe, so it didn’t steal focus. But if it had been a brighter pure white, it would have split the viewer’s attention and weakened the image.
This is the step most beginners skip entirely. You find your subject, you frame it, you shoot. But you need to spend a few seconds scanning the full frame for anything that outcompetes your subject on brightness, saturation, contrast, or recognizable faces. A blown-out window in the background. A red jacket on a stranger at the edge of the frame. A street sign with high-contrast text. Any of these can quietly undermine a shot that looked good on your LCD.
Step 4: Anticipate the Visual Path Through the Frame
 Description of how eye travels through image before landing on subject
Once you know where the attractors are, you can start thinking about sequence, not just destination. Your viewer’s eye doesn’t teleport to the subject. It travels. Tucker frames this as anticipating the visual path your viewer will take through the image when they first encounter it.
Description of how eye travels through image before landing on subject
Once you know where the attractors are, you can start thinking about sequence, not just destination. Your viewer’s eye doesn’t teleport to the subject. It travels. Tucker frames this as anticipating the visual path your viewer will take through the image when they first encounter it.
A strong composition guides that path efficiently and rewards the viewer when they arrive at the subject. A weak one lets the eye wander, stall on distractions, or exit the frame before finding what matters. Think of it like giving someone directions to your house. You want clear turns, not wrong streets they have to backtrack from.
Step 5: Use the Rules as Instruments, Not Instructions
 Tucker explaining the difference between giving a fish and teaching to fish
This is where Tucker’s real argument lands. The rule of thirds, leading lines, subframing, golden ratios - none of these are wrong. They’re useful. But they’re derivatives of the deeper visual psychology we’ve been talking about. The rule of thirds works partly because it prevents your subject from sitting in the center where contrast with the background is often weakest and the image feels static.
Tucker explaining the difference between giving a fish and teaching to fish
This is where Tucker’s real argument lands. The rule of thirds, leading lines, subframing, golden ratios - none of these are wrong. They’re useful. But they’re derivatives of the deeper visual psychology we’ve been talking about. The rule of thirds works partly because it prevents your subject from sitting in the center where contrast with the background is often weakest and the image feels static.
When you understand the “why,” you can break the rules deliberately and get away with it. Centering a subject works brilliantly when the surrounding elements create a frame or when the symmetry itself is the point. You stop asking “which rule applies here” and start asking “where does the eye need to go, and how do I get it there.”
One Thing I’d Add From My Own Shooting
The four attractors Tucker describes work on a still frame, but I’ve found they’re even more useful as a scanning checklist when I’m shooting in chaotic environments. I do a lot of travel photography, and busy markets or street scenes are full of competing bright spots, saturated colors, and strangers’ faces.
What I do now - especially when shooting on my phone, which I still do regularly just to keep my instincts honest - is a quick mental “brightness sweep” before I commit to a frame. I’m literally asking myself: what is the single brightest thing I can see right now? Is it my subject? If not, can I reposition so it is, or wait for the light to shift? It sounds slow but it becomes fast. After a few months of intentional practice on my Sunday walks, it collapsed into something that happens almost automatically before I tap the shutter button.
The other thing I’d note is that faces are a particularly aggressive attractor - stronger than the other three in most cases. If there is a human face anywhere in your frame, assume your viewer will find it before anything else. That’s a tool, not a limitation. Use it.
The single most important shift Tucker is nudging you toward is treating composition as prediction rather than decoration. You’re predicting where a stranger’s eye will go, and arranging the elements so that journey ends somewhere meaningful. Get that right and the specific rules become almost secondary - they’re just vocabulary for a conversation you already understand.
Watch the full tutorial on YouTube - Tucker goes further into specific image examples and the intuition-building that comes with practice, which is well worth your time.
Comments
Leave a Comment