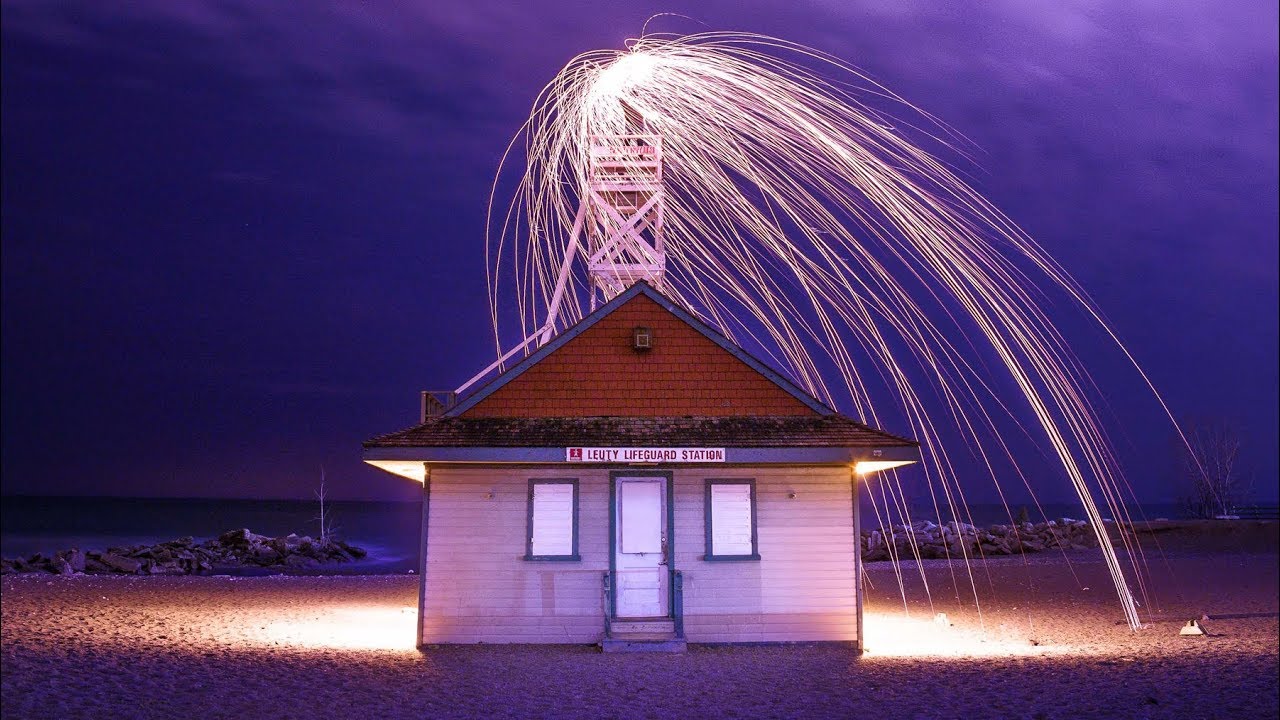
Every few months I’ll stumble across a photo on Instagram that stops me mid-scroll. You know the kind. Someone standing in the middle of a dark field, surrounded by what looks like a galaxy of sparks, orange and gold streaks radiating outward like a living firework. I’d double-tapped those shots a dozen times before I ever understood how they were made. That changed when I watched Peter McKinnon’s steel wool tutorial with his collaborator, photographer and creative director Chris Hau, who actually leads the technique breakdown. Watch the full tutorial on YouTube
What I love about this tutorial is that Peter walks in as a complete beginner and Chris teaches in real time, which means the questions a newcomer would actually ask get answered as they come up. There’s no assumed knowledge here. As someone who spends Sunday mornings on photo walks trying to push myself into unfamiliar territory, this one gave me a genuine new direction to explore. Steel wool photography sits at the intersection of long exposure technique and pure creative chaos, and it turns out the barrier to entry is much lower than those dramatic photos suggest.
The results look expensive and complicated. The process is not. Here is exactly how to do it.
Step 1: Understand What Steel Wool Photography Actually Is
 Chris explaining steel wool spinning creates flying embers
Steel wool photography uses fine-grade steel wool, the kind sold at hardware stores, packed into a small container, lit with a flame or battery, and spun on the end of a wire or rope. As the steel wool burns, it throws off a cascade of bright embers in every direction. When you photograph that spinning motion with a long camera exposure, those ember trails become streaks of light, and the result looks like something between a sparkler and a special effect from a fantasy film. The key technical idea is that your camera shutter stays open long enough to record the full arc of those light trails. Nothing about this is digital trickery. Every streak is a real ember.
Step 2: Gather Your Materials (They Are Cheaper Than You Think)
 Steel wool and wire whisk displayed as required materials
You need steel wool (fine grade, labeled 0 or 00 works well), a wire whisk from a dollar or kitchen store, a length of metal chain or wire about a meter long, and a 9-volt battery to ignite it. Pack the steel wool loosely into the whisk head so air can circulate. Attach your chain or wire securely to the whisk handle. The open wire whisk acts as both a container and a launcher, letting embers fly outward as it spins without immediately dropping burning material straight down. The 9-volt battery ignites the steel wool by briefly touching both terminals to the fibers. It catches fast, so have your camera ready before you spark it.
Step 3: Set Up Your Camera for Long Exposure
 Camera on tripod in dark location, long exposure settings discussed
Put your camera on a sturdy tripod. You will be shooting in the dark, probably at night or in a low-light environment, and any camera movement will ruin the shot. Set your mode to Manual (M). Start with an ISO around 100 to 200 to keep noise low since the embers themselves are very bright. Set your aperture somewhere between f/8 and f/16. A narrower aperture gives you more depth of field and prevents the highlights from blowing out. Your shutter speed is the variable you will experiment with most: start at around 10 to 15 seconds and adjust from there. Use a remote shutter release or your camera’s self-timer so you are not touching the body when the shutter opens.
Step 4: Choose Your Location Carefully
 Open outdoor space described for safe steel wool shooting
Location is both a creative and a safety decision. Chris is direct about this in the tutorial: he nearly set a field on fire his first time out because the excitement of the shot took over from common sense. Choose open spaces with no dry grass, low branches, or flammable structures nearby. Concrete under a bridge, a rocky beach, or an empty parking lot are popular choices for good reason. Beyond safety, think compositionally. An interesting architectural backdrop or a body of water beneath the spinner adds a second layer to the image. Reflections of the ember trails on water are stunning and essentially give you a mirrored version of the shot for free.
Step 5: Position Your Subject and Frame the Shot
 Photographer and spinner positioning relative to camera discussed
The person spinning the steel wool should be centered in the frame unless you have a deliberate reason to place them off-center. Give them enough room in the frame that the full arc of sparks stays within the shot. A wider lens (24mm to 35mm on a full-frame body) helps capture the spread. Your subject needs to spin the whisk at a consistent speed in a full overhead circle. Uneven spinning produces uneven streaks, so a smooth, confident rotation makes a real difference. If you are the photographer, communicate clearly before ignition because once it starts, the steel wool burns fast. You have roughly 20 to 30 seconds of usable burn time, so everyone needs to be ready.
Step 6: Ignite, Spin, and Shoot
 Battery touching steel wool to ignite it before spinning begins
Touch the 9-volt battery contacts to the steel wool while it sits inside the whisk. The wool catches almost immediately. The spinner should begin rotating as soon as ignition happens, keeping the arc smooth and continuous. The photographer opens the shutter at the start of the spin and closes it when the steel wool burns out or the desired duration is reached. Review your first frame immediately. Check the histogram for clipping in the highlights, check that the full arc of sparks fits inside the frame, and adjust your shutter speed up or down based on how much trail density you want. More time open means more streaks and a fuller, denser orb of light.
What I’d Add: Go Back to the Same Spot Twice
The first attempt at steel wool photography is almost always a calibration run, not a keeper. My suggestion is to do a technical dry run at your chosen location before you actually ignite anything. Walk the spacing, confirm your frame, check your focus using a flashlight on your subject, and lock in your exposure settings. The wool burns fast and you want those 20-odd seconds to be about creative execution, not troubleshooting your aperture.
I’d also encourage experimenting with background choice before assuming dark and empty is best. Some of my favorite reference shots I’ve seen from this technique use old industrial structures or graffiti walls as backdrops. The sparks interact with color and texture in ways that a plain dark sky simply doesn’t allow.
The single most important thing to take away from this tutorial is this: safety is not optional and it is not a mood-killer. Choosing the right location protects not just you but also the places we all want to keep shooting in. Get that right, and the technical side of this is genuinely approachable in a single evening outing.
Watch the full tutorial on YouTube to see Peter and Chris work through the full process in real time, including watching the first shots come out of the camera.
Comments
Leave a Comment