Every Sunday morning I take a photo walk through my Seattle neighborhood, and I almost always come home with a card full of raw files I’m not entirely sure what to do with. The composition feels right, the light was good, but somewhere between capture and export the image loses the energy I felt when I pressed the shutter. That gap between what you saw and what the edit delivers is the thing I kept hearing photographers describe when I first started teaching, and it’s exactly the problem that editing tutorials built around real submitted photos solve so well.
In this Peter McKinnon tutorial, part of his ongoing “Editing YOUR Photos” series, McKinnon works through seven raw files submitted by his followers — unposed, unpredictable, real-world shots — and edits each one live. Watch the full tutorial on YouTube. What I find most valuable here isn’t just the slider movement. It’s watching someone with a clear, committed editing identity make fast, confident decisions on photos they’ve never seen before. That decisiveness is a skill, and it’s learnable.
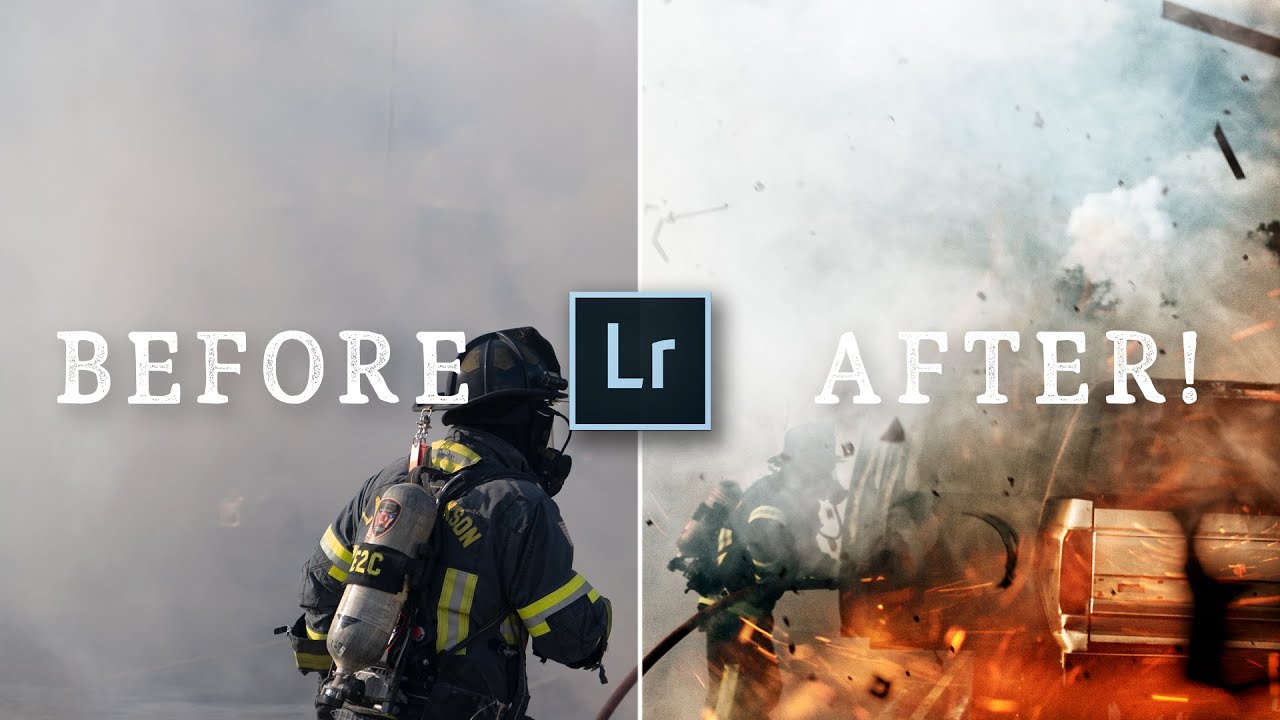
The photo that anchors the walkthrough is a dramatic fire scene shot by a beginner photographer in Texas who happened to have his camera ready when a truck caught fire in a church parking lot. It’s chaotic, emotionally charged, and technically imperfect in all the ways spontaneous photojournalism tends to be. Watching how McKinnon approaches it tells you a lot about how to develop your own editing instincts.
Step 1: Start With a Clear Creative Intent
 McKinnon describing his approach to the fire photo
Before touching a single slider, McKinnon decides what the photo needs to feel like. For this fire shot, he commits immediately to making it look like an action movie poster. That sounds like a stylistic flourish, but it’s actually a practical framework. When you know the emotional target, every adjustment either serves it or doesn’t. You stop second-guessing contrast decisions and start making them.
McKinnon describing his approach to the fire photo
Before touching a single slider, McKinnon decides what the photo needs to feel like. For this fire shot, he commits immediately to making it look like an action movie poster. That sounds like a stylistic flourish, but it’s actually a practical framework. When you know the emotional target, every adjustment either serves it or doesn’t. You stop second-guessing contrast decisions and start making them.
Before you open Lightroom, spend thirty seconds looking at your photo and naming the feeling you want the viewer to have. Write it down if you need to. “Gritty and urgent” and “soft and nostalgic” require completely different tools, and having that anchor keeps you from wandering through sliders aimlessly.
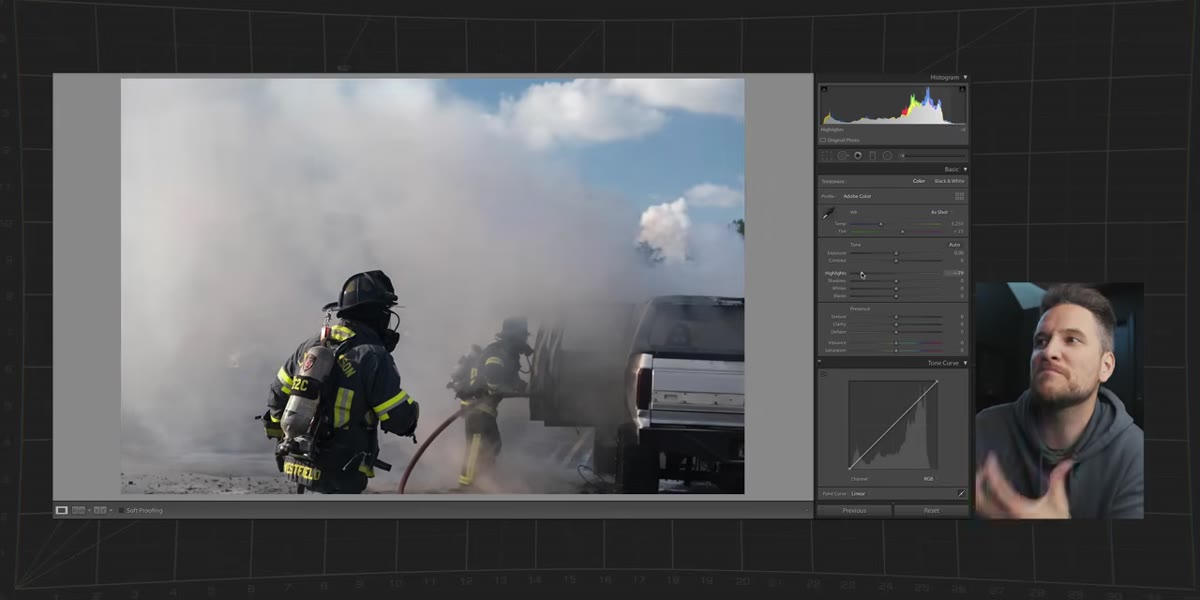
Step 2: Apply a Preset as a Starting Point, Not a Final Answer
 McKinnon applying his “Pirate Life” preset to the fire image
McKinnon applies one of his own Lightroom presets early in the edit. The key thing to understand here is how he uses it: as a directional push, not a finished result. The preset moves the image toward the mood he’s after quickly, so he can spend his time on refinement rather than building from zero every single time.
McKinnon applying his “Pirate Life” preset to the fire image
McKinnon applies one of his own Lightroom presets early in the edit. The key thing to understand here is how he uses it: as a directional push, not a finished result. The preset moves the image toward the mood he’s after quickly, so he can spend his time on refinement rather than building from zero every single time.
If you’re using presets, apply one that gets you roughly 60 to 70 percent of the way to the look you want, then treat everything after that as customization. The mistake most beginners make is applying a preset and calling it done, or applying one and immediately overwriting every value it changed. Let it inform the edit. Adjust from there with intention.
Step 3: Push the Atmosphere Harder Than You Think You Should
 McKinnon emphasizing smoke, fog, and mist in the fire photo
With the fire shot, McKinnon specifically talks about looking at what’s already in the frame, smoke, mist, the haze from the fire, and asking how to amplify it. He’s not adding atmosphere that isn’t there. He’s pulling out what the raw file compressed or flattened during capture.
McKinnon emphasizing smoke, fog, and mist in the fire photo
With the fire shot, McKinnon specifically talks about looking at what’s already in the frame, smoke, mist, the haze from the fire, and asking how to amplify it. He’s not adding atmosphere that isn’t there. He’s pulling out what the raw file compressed or flattened during capture.
In Lightroom, this usually means working with the Texture, Clarity, and Dehaze sliders in combination. For dramatic, high-contrast scenes, pulling Dehaze slightly upward thickens atmospheric elements while boosting mid-tone contrast. Paired with a lift in Clarity, this gives smoke and haze more visual weight without blowing out highlights. Go further than feels comfortable. You can always walk it back, but you’ll often find the image holds more than you expected.
Step 4: Treat the Edit as a Question of “How Far Can I Push This?”
 McKinnon asking aloud how extreme he can make the edit
This is the mindset shift that changed how I edit my own work. McKinnon frames the edit as an experiment with a ceiling he hasn’t found yet. He’s not asking “is this too much?” He’s asking “where does this break?” That’s a completely different creative posture.
McKinnon asking aloud how extreme he can make the edit
This is the mindset shift that changed how I edit my own work. McKinnon frames the edit as an experiment with a ceiling he hasn’t found yet. He’s not asking “is this too much?” He’s asking “where does this break?” That’s a completely different creative posture.
Set a five-minute timer and push every dramatic element in your edit as far as it will go without the image falling apart. Blown highlights, crushed blacks, maxed-out vibrance. Then pull back each one until the image looks intentional rather than broken. You’ll land in a place you’d never have found by nudging cautiously from the center.
Step 5: Use the Image’s Genre to Guide Your Choices
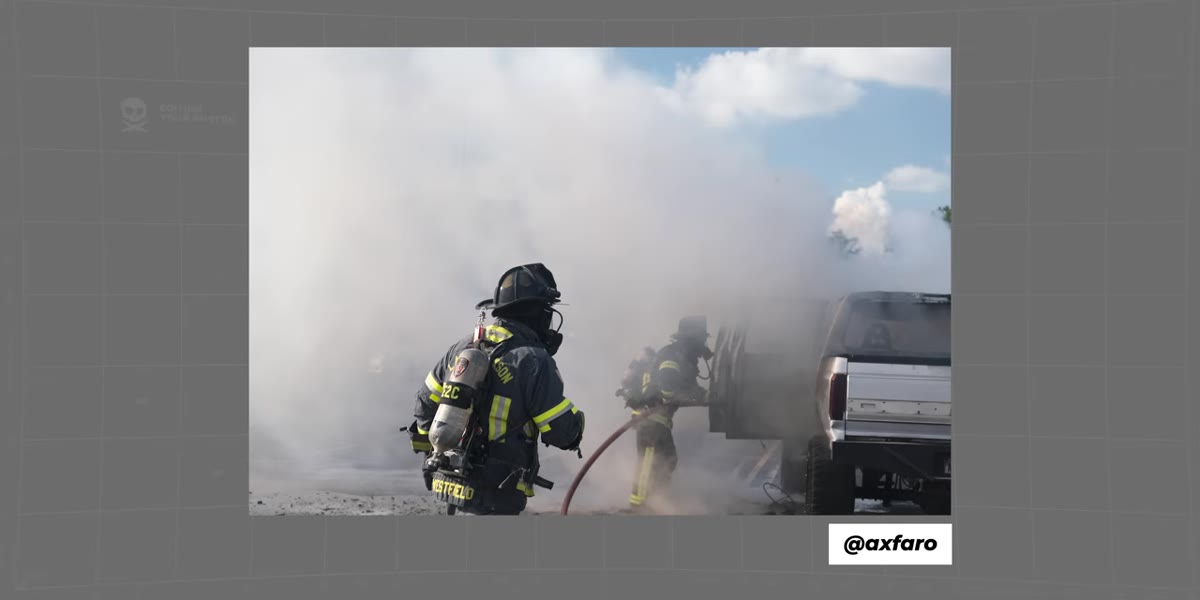 McKinnon noting the photo is photojournalism, not a portrait
McKinnon makes a point of identifying the fire photo as photojournalism, and that classification matters for how he edits it. Photojournalism tolerates, even benefits from, grittiness. Grain, high contrast, and aggressive shadows reinforce the immediacy of the moment. The same edit applied to a family portrait would feel harsh and unflattering.
McKinnon noting the photo is photojournalism, not a portrait
McKinnon makes a point of identifying the fire photo as photojournalism, and that classification matters for how he edits it. Photojournalism tolerates, even benefits from, grittiness. Grain, high contrast, and aggressive shadows reinforce the immediacy of the moment. The same edit applied to a family portrait would feel harsh and unflattering.
Ask yourself what genre your photo lives in before you start adjusting. A street photo and a landscape might both be wide-angle exterior shots, but they want different treatment. Street photography usually earns a harder, moodier edit. Landscapes often reward luminosity and tonal separation. Letting genre lead your instincts cuts decision fatigue in half.
Step 6: Always Have Your Camera Ready and Charged
 McKinnon reacting to the backstory of the fire photo
This one isn’t a Lightroom tip. McKinnon pauses on the backstory of the fire photo, where the photographer grabbed his camera because he already had it with him at a church visit, and makes the point that you can’t edit a photo you didn’t take. A dead battery is an image that doesn’t exist.
McKinnon reacting to the backstory of the fire photo
This one isn’t a Lightroom tip. McKinnon pauses on the backstory of the fire photo, where the photographer grabbed his camera because he already had it with him at a church visit, and makes the point that you can’t edit a photo you didn’t take. A dead battery is an image that doesn’t exist.
Keep a charging habit. I charge my camera every time I walk in the door, the same way I charge my phone. It takes thirty seconds to build the habit and it has saved me more times than I can count, including once on a waterfall trip in Iceland where I missed dinner four nights in a row but never missed a shot because the battery was always full when I needed it.
What I’d Add From My Own Experience
McKinnon’s approach is bold and fast, which works because he has a strong editing identity already built. If you’re earlier in that process, the “how far can I push this” exercise is valuable, but I’d add one guardrail: do it on a duplicate of the file. In Lightroom, create a virtual copy before you go extreme. That way you preserve your baseline edit and you can compare the two without committing. It also makes it much easier to see whether you actually prefer the dramatic version or just got used to it.
The deeper lesson from this entire episode is that editing other people’s photos, whether through a series like McKinnon’s or through swapping files with a photographer friend, strips away the attachment you have to your own captures and forces you to make decisions based purely on what the image needs. I started doing editing swaps with a friend every few months and it’s one of the most useful exercises I’ve found for developing a consistent style.
The single most important thing McKinnon demonstrates in this video isn’t any specific slider value. It’s that every edit starts with a decision about what you want the image to feel like, and every adjustment after that is just in service of that feeling. Get clear on the feeling first. The tools will follow.
Watch the full tutorial on YouTube to see all seven photo edits and the specific preset applications McKinnon walks through on each one.
Comments
Leave a Comment