
Every few months I submit work to photography competitions, and for a long time I kept making the same quiet mistake. I’d scroll through my Lightroom catalog, find something I was genuinely proud of, and send it in thinking, “This is strong work. Surely that’s enough.” It wasn’t. The results were a lesson I didn’t fully understand until I watched Karl Taylor’s competition breakdown over at Visual Education.
Watch the full tutorial on YouTube
What makes this tutorial genuinely useful is that Karl isn’t just talking theory. He runs the competitions himself, which means he’s explaining the judging process from the inside. The gap between “good photo” and “winning photo” turns out to be much more specific than most people realize. Here’s how to close that gap.
Step 1: Understand That Theme Compliance Is Non-Negotiable
 Judge explaining how narrative must represent the theme
Before you touch your catalog or pick up a camera, read the competition brief again. Then read it one more time. Karl is very direct about this: a technically flawless image that doesn’t connect to the stated theme will score zero points, no matter how beautiful it is. This isn’t a technicality. Theme relevance is a primary judging criterion, weighted heavily enough to eliminate otherwise excellent work entirely.
Judge explaining how narrative must represent the theme
Before you touch your catalog or pick up a camera, read the competition brief again. Then read it one more time. Karl is very direct about this: a technically flawless image that doesn’t connect to the stated theme will score zero points, no matter how beautiful it is. This isn’t a technicality. Theme relevance is a primary judging criterion, weighted heavily enough to eliminate otherwise excellent work entirely.
That might feel harsh, but it makes sense when you think about it from the judge’s perspective. A competition around the theme “fast” is asking entrants to demonstrate creative interpretation of a concept. Sending in a gorgeous portrait of your friend, just because it’s your best recent work, tells the judge you didn’t engage with the brief at all.
Step 2: Interpret the Theme, Don’t Just Illustrate It
 Karl discussing personal perception and interpretation of the theme
Here’s where things get interesting. Karl points out that judges typically won’t define the theme beyond what’s written. That’s intentional. Your interpretation is actually part of what’s being evaluated. Two photographers given the theme “red” might produce wildly different images, and both can be valid, because the brief is designed to invite creative thinking, not replicate a stock photo result.
Karl discussing personal perception and interpretation of the theme
Here’s where things get interesting. Karl points out that judges typically won’t define the theme beyond what’s written. That’s intentional. Your interpretation is actually part of what’s being evaluated. Two photographers given the theme “red” might produce wildly different images, and both can be valid, because the brief is designed to invite creative thinking, not replicate a stock photo result.
So instead of asking “what kind of image fits this theme?” ask yourself what the theme means to you personally. What story does it suggest? What emotion does it carry? The photographs that tend to rise to the top aren’t the most literal ones. They’re the ones where you can feel the photographer genuinely thought about it. Start with a brainstorm. Write down ten different ways to express the theme before you settle on one.
Step 3: Decide Between Shooting Fresh or Pulling From Your Archive
 Competition page showing theme names and upcoming deadlines
Karl mentions that competitions with quarterly schedules are structured specifically to give photographers enough lead time to go out and shoot something new if they want to. That’s a meaningful detail. Many entrants default to catalog-diving, which isn’t wrong, but it does mean you’re limited to whatever you happened to capture before you knew the theme existed.
Competition page showing theme names and upcoming deadlines
Karl mentions that competitions with quarterly schedules are structured specifically to give photographers enough lead time to go out and shoot something new if they want to. That’s a meaningful detail. Many entrants default to catalog-diving, which isn’t wrong, but it does mean you’re limited to whatever you happened to capture before you knew the theme existed.
My personal recommendation, especially for themes with strong conceptual angles, is to shoot something new. Even a Sunday morning photo walk with the theme in the back of your mind will generate more purposeful material than hours of archive searching. You’re not just looking for an image that technically qualifies. You’re looking for one that feels like it was made with intention.
Step 4: Evaluate Your Shortlisted Images Against the Theme First, Quality Second
 Karl describing off-topic images being eliminated regardless of quality
Once you have candidates, flip your usual evaluation order. Most of us naturally lead with image quality, asking which photo is sharpest, best exposed, most dramatic. For competitions, the first filter has to be thematic alignment. Pull out any image where a viewer unfamiliar with the brief might not immediately understand the connection.
Karl describing off-topic images being eliminated regardless of quality
Once you have candidates, flip your usual evaluation order. Most of us naturally lead with image quality, asking which photo is sharpest, best exposed, most dramatic. For competitions, the first filter has to be thematic alignment. Pull out any image where a viewer unfamiliar with the brief might not immediately understand the connection.
After you’ve filtered for theme, then bring in your quality criteria. Look at technical execution, composition, and emotional impact. This two-stage process prevents you from falling in love with a technically strong image that was never going to score well in the first place. It saves time and protects you from confirmation bias.
Step 5: Don’t Submit Just Because You Can
 Karl advising against randomly throwing in images you like
Karl makes a point that sounds obvious until you realize how often people ignore it: don’t submit an image simply because it’s good and you like it. Competitions aren’t a general gallery. They’re a structured evaluation against specific criteria, and submitting off-theme work doesn’t just fail to win, it can reflect poorly on how carefully you read the brief.
Karl advising against randomly throwing in images you like
Karl makes a point that sounds obvious until you realize how often people ignore it: don’t submit an image simply because it’s good and you like it. Competitions aren’t a general gallery. They’re a structured evaluation against specific criteria, and submitting off-theme work doesn’t just fail to win, it can reflect poorly on how carefully you read the brief.
If you genuinely don’t have an image that fits the theme well, that’s useful information. It might mean the current theme doesn’t play to your strengths, and that’s fine. Save your submission slot for the next round when the theme aligns better with what you actually shoot. Quality entry counts matter more than volume.
Step 6: Look at Past Winners Before You Submit
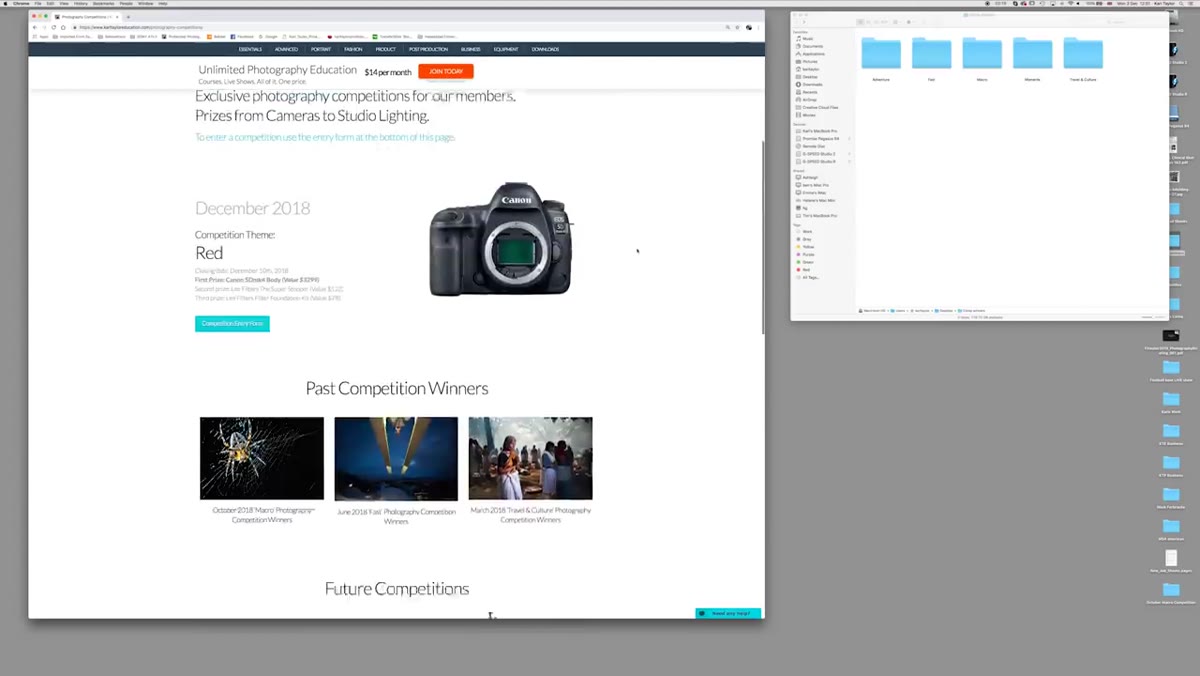 Past competition winners page showing standard of winning entries
Karl’s platform publishes past winners, and he flags this as a resource entrants should actually use. Before you finalize your submission, look at what has won before. You’re not trying to copy those images. You’re calibrating your expectations and understanding the standard you’re entering against.
Past competition winners page showing standard of winning entries
Karl’s platform publishes past winners, and he flags this as a resource entrants should actually use. Before you finalize your submission, look at what has won before. You’re not trying to copy those images. You’re calibrating your expectations and understanding the standard you’re entering against.
Pay attention to the variety in winning submissions. Notice whether judges seem to favor bold conceptual work or more classical photographic execution. Notice the range of subjects. This research takes twenty minutes and gives you a much clearer sense of whether your selected image is genuinely competitive or whether it’s a strong photo that falls short of the standard in this particular field.
One Thing I’d Add From My Own Experience
The tip Karl doesn’t spell out explicitly, but which I think matters enormously, is the difference between an image that represents a theme and an image that embodies it. Representing a theme is easy. A photo of a red car for the theme “red” represents the theme. But an image where the redness feels emotionally central, where you couldn’t remove the color without losing the whole point of the picture, that image embodies the theme.
I think about this the same way I think about travel photography. A snapshot in front of a landmark represents a place. But the photo that captures the light at 6am on a Tuesday when the market vendors are just setting up, that one embodies it. Judges who look at hundreds of entries develop a feel for the difference almost immediately. Aim for the second category.
The single most transferable insight from Karl’s tutorial is this: theme compliance is the floor, not the ceiling. You need it just to be considered, and then everything else has to be excellent on top of it. Stop submitting work you love and start submitting work that was genuinely built for the brief.
Watch the full tutorial on YouTube to hear Karl walk through specific past competition examples and explain exactly how the judging panel works through submissions from start to finish.
Comments
Leave a Comment