
I make playlists for everything. Shooting moods, editing sessions, long exports. So when I’m cutting a travel video and I want the b-roll to sync with the music, it matters to me. What doesn’t feel great is spending forty-five minutes dragging clips one by one onto a timeline, nudging them around, playing it back, nudging again. That workflow kills the creative energy faster than a dead battery at golden hour.
In this Peter McKinnon tutorial, Watch the full tutorial on YouTube, he walks through a Premiere Pro feature that most editors either don’t know about or forget exists: Automate to Sequence. The whole idea is that you let the software place your clips on the timeline for you, locked to markers you’ve already set on the beat. What used to take an hour of fussy manual editing can happen in about two minutes. Genuinely. I tested it.
This technique is specifically built for b-roll sequences set to music, which covers a huge portion of the travel, lifestyle, and short-form content that a lot of us are making right now. Here’s the full walkthrough so you can follow along without needing to pause and rewind every thirty seconds.
Step 1: Drag Your Music Track onto the Timeline
 Music track being placed onto Premiere Pro timeline
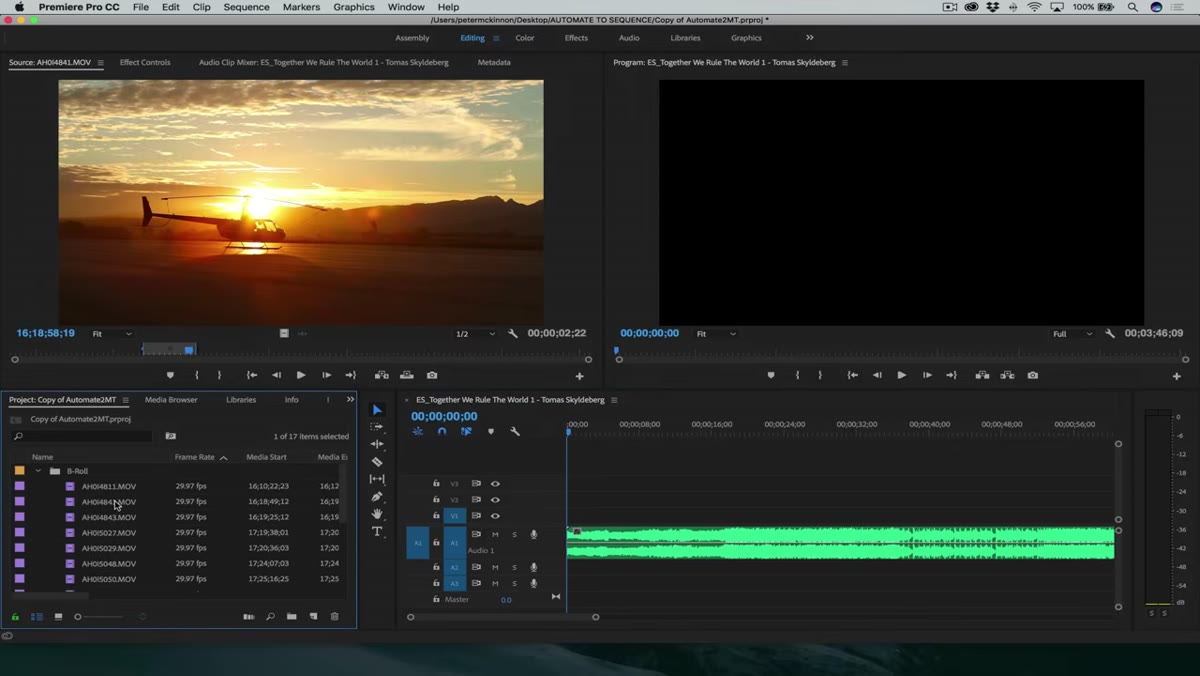
Before anything else, your audio needs to be on the timeline. Open Premiere Pro, create your sequence, and drag your music track down. This is the foundation everything else builds on. You’re not editing picture yet. Right now the audio track is just a map you’re going to mark up.
Music track being placed onto Premiere Pro timeline
Before anything else, your audio needs to be on the timeline. Open Premiere Pro, create your sequence, and drag your music track down. This is the foundation everything else builds on. You’re not editing picture yet. Right now the audio track is just a map you’re going to mark up.
Make sure your playhead is at the beginning of the track before moving forward. You want to hear the full song from the top when you start dropping markers.
Step 2: Confirm Your Marker Keyboard Shortcut
 Keyboard Shortcuts panel with M key assigned to Add Marker
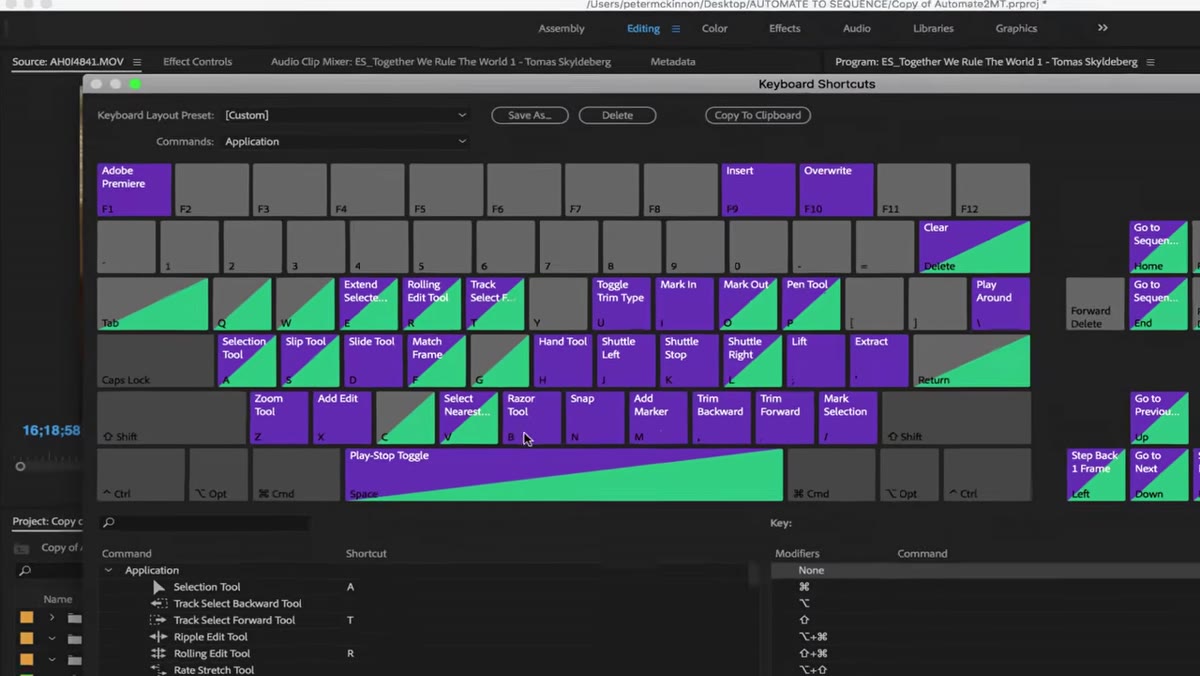
Go to Premiere Pro in the top menu bar and click Keyboard Shortcuts. In the search field, type “add marker” and confirm that the M key is assigned to that function. If it isn’t, drag the Add Marker command onto the M key to set it.
Keyboard Shortcuts panel with M key assigned to Add Marker
Go to Premiere Pro in the top menu bar and click Keyboard Shortcuts. In the search field, type “add marker” and confirm that the M key is assigned to that function. If it isn’t, drag the Add Marker command onto the M key to set it.
This single shortcut is what makes the whole technique fast. You don’t want to be reaching for a menu every time you hear a beat drop. Having M at your fingertips means you can keep your eyes on the waveform and your hand on the keyboard, which is where it belongs.
Step 3: Set In and Out Points for Every B-Roll Clip
 Source monitor showing clip with in and out points set
Open your b-roll folder in the Project panel and go through each clip in the Source monitor. For every clip, set an in point (keyboard shortcut: I) at the frame where you want the clip to begin, and an out point (keyboard shortcut: O) where you want it to end. These don’t have to be perfect. Just define a usable range for each clip.
Source monitor showing clip with in and out points set
Open your b-roll folder in the Project panel and go through each clip in the Source monitor. For every clip, set an in point (keyboard shortcut: I) at the frame where you want the clip to begin, and an out point (keyboard shortcut: O) where you want it to end. These don’t have to be perfect. Just define a usable range for each clip.
This step is what gives Automate to Sequence something to work with. The feature will pull exactly the range you defined, so a little time spent trimming here saves a lot of cleanup later. Think of it as laying out your ingredients before you start cooking.
Step 4: Play the Timeline and Drop Markers on the Beat
 Timeline showing multiple markers placed along audio track
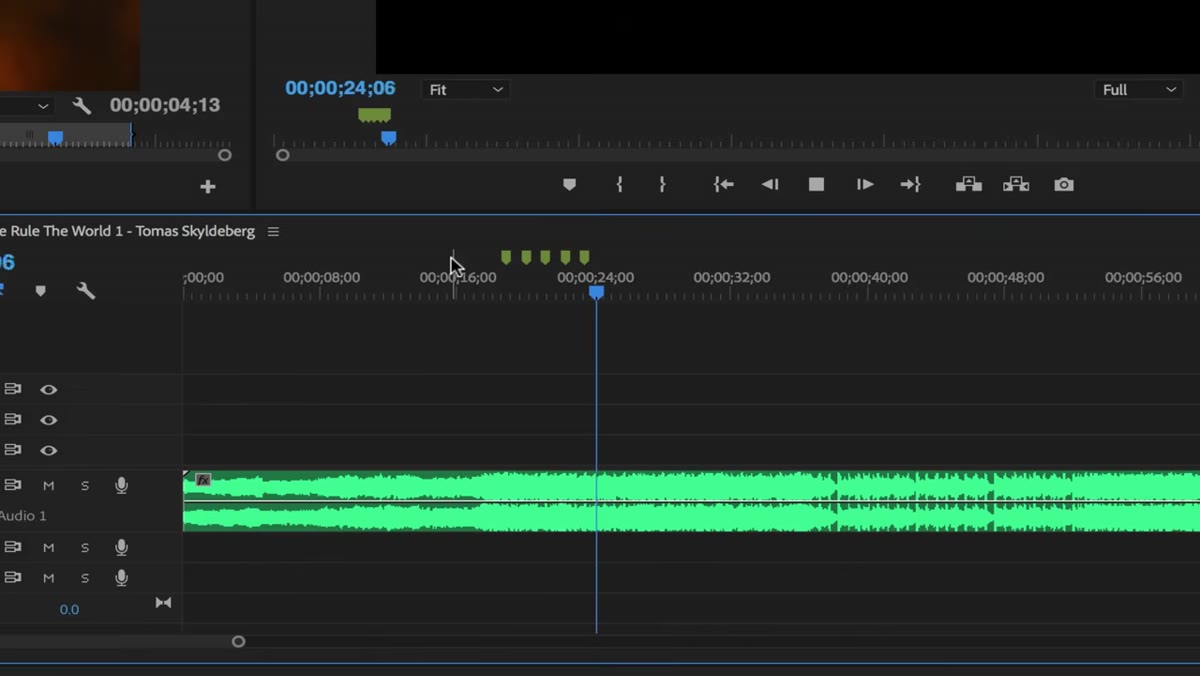
Hit the spacebar and let the timeline play. As you listen to the music, press M every time you hear a beat where you want a cut. Don’t overthink it. Trust your instincts and tap along. If you’re a little early or late on a marker, you can nudge it afterward, but usually your first pass is closer than you think.
Timeline showing multiple markers placed along audio track
Hit the spacebar and let the timeline play. As you listen to the music, press M every time you hear a beat where you want a cut. Don’t overthink it. Trust your instincts and tap along. If you’re a little early or late on a marker, you can nudge it afterward, but usually your first pass is closer than you think.
The markers show up as small colored flags along the timeline. Each one represents a future edit point. The number of markers you drop roughly corresponds to how many clips will be placed, so if you have twelve b-roll clips, you’ll want at least twelve markers. You can always drop a few extra.
Step 5: Select All Your B-Roll Clips in the Project Panel
 Project panel with all b-roll clips highlighted/selected
Click the first clip in your b-roll folder inside the Project panel. Then scroll to the bottom of the folder, hold Shift, and click the last clip. This selects everything in between. You want all of your b-roll clips highlighted before moving to the next step.
Project panel with all b-roll clips highlighted/selected
Click the first clip in your b-roll folder inside the Project panel. Then scroll to the bottom of the folder, hold Shift, and click the last clip. This selects everything in between. You want all of your b-roll clips highlighted before moving to the next step.
If your clips are mixed in with other assets, consider creating a dedicated b-roll bin before you start this process. It keeps the selection clean and avoids accidentally pulling in audio files or graphics you didn’t intend to use.
Step 6: Run Automate to Sequence
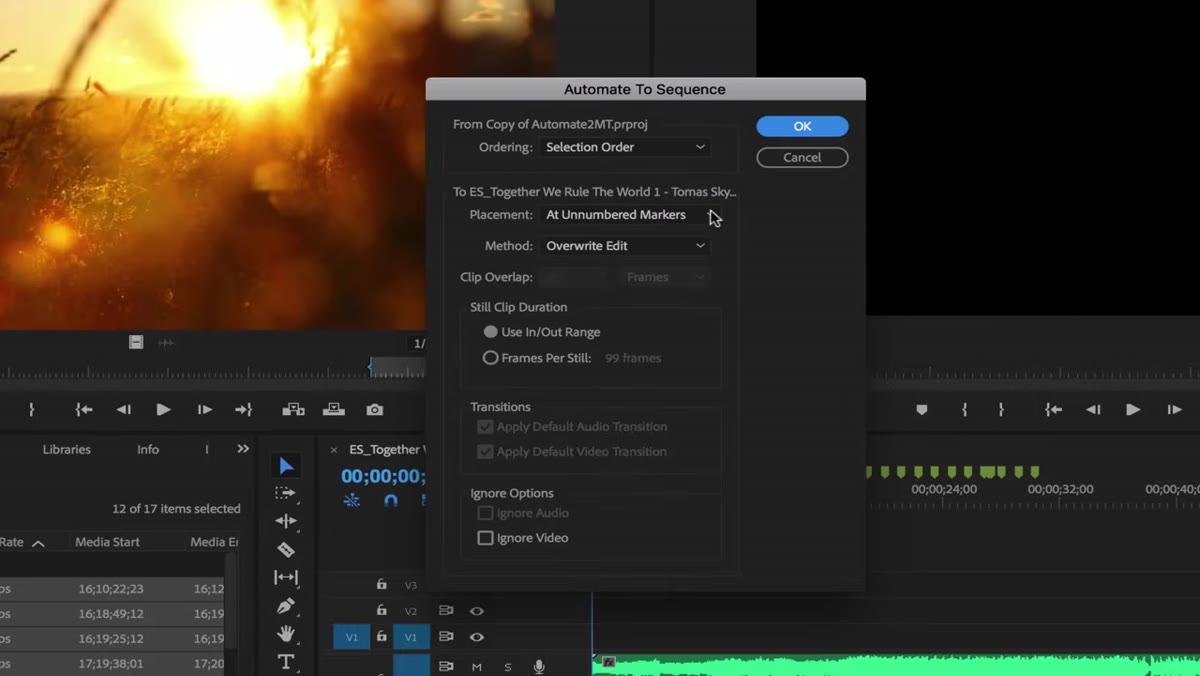 Automate to Sequence dialog box with settings visible
With all your clips selected, go to the Clip menu in the top navigation bar and choose Automate to Sequence. A dialog box will appear with a few options. The key setting here is Placement. Change that dropdown from “Sequentially” to “At Numbered Markers.” Then click OK.
Automate to Sequence dialog box with settings visible
With all your clips selected, go to the Clip menu in the top navigation bar and choose Automate to Sequence. A dialog box will appear with a few options. The key setting here is Placement. Change that dropdown from “Sequentially” to “At Numbered Markers.” Then click OK.
Premiere will place each clip directly onto the timeline at the marker points you set in Step 4. The clips snap into place, trimmed to the in and out points you defined earlier. Play it back and you’ll hear the cuts landing on the beat. It’s a genuinely satisfying moment the first time you see it work.
A Note on Making This Technique Your Own
The tutorial covers the core workflow cleanly, but one thing I’d add from my own editing sessions is to be intentional about clip order before you run Automate to Sequence. Premiere places the clips in whatever order they appear in your selection, top to bottom in the Project panel. If you want a specific visual story arc, rearrange your clips in the bin first. Drag your establishing shots to the top, your close-up detail shots lower down, your wide payoff shots toward the end. A few seconds of organizing before you click OK means the sequence tells an actual story instead of just looking pretty.
I also like to run this technique once with my full clip selection, then go back and manually swap out two or three clips that feel repetitive side by side. The automation gives you a solid 80% of the way there. The last 20% is your creative eye, which no shortcut replaces.
Markers are the real unlock here. Once you understand that you can map any rhythm onto a timeline and let Premiere do the heavy lifting of placement, your b-roll editing becomes a completely different experience. The technique is fast, it’s repeatable, and it keeps you in the creative flow instead of buried in the mechanical work.
Watch the full tutorial on YouTube to see Peter walk through this in real time. Watching the markers drop as the music plays makes the rhythm of the whole process click in a way that’s hard to fully describe in text.
Comments
Leave a Comment